
A fun Friday evening--verifying an AXI-lite slave
On a whim, at the end of a long week, I decided to try something new yesterday. I decided to try to verify an AXI design in front of others. My goal was to do something fun and perhaps to have a little excitement.
 |
Sadly, one of the challenges of writing blog articles about formal verification is that few people realize how easy it actually is. They just look at the article, figure it was a fun read, or perhaps that I as an author am an amazing verification engineer. What you don’t realize is that a lot of these things can be done in just minutes, while saving you weeks of heartache trying to debug something in hardware.
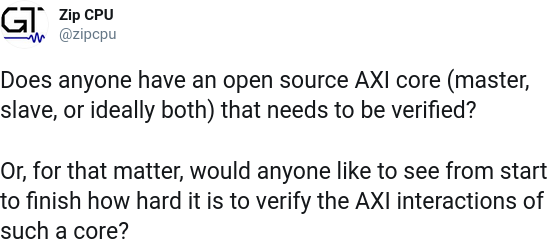
So, I started out with a tweet yesterday morning asking if anyone would want to see what it takes to formally verify a AXI-based design, and whether or not any one had a design they wished to share.
 |
Many individuals indicated their interest in watching me verify a design, but no one offered a sacrificial design. So I went looking for a design with an AXI interface that could be verified publicly.
I first checked the Vivado sources that come with the install. One of the fun things about Vivado is that it comes with so much IP. Much of this IP is in VHDL. VHDL wouldn’t be ideal, since it requires the commercial version of SymbiYosys, but its not out of the question thanks to the Symbiotic EDA team who have provided me with a copy to work with. Even better, I have a bit of experience verifying Vivado IP, so I know the basic steps. In the past I’ve looked at their AXI-APB bridge, AHB-lite to AXI bridge, AXI-ethernet lite, AXI GPIO, and AXI IPIF logic cores. I’ve also verified their demonstration designs for AXI master, AXI slave, AXI-lite master, AXI-lite slave, and their AXI-stream master. Several of these designs have nice bugs that are fun to find with SymbiYosys.
In the end, this didn’t pan out. My problem was that I didn’t want to just show a previously verified design and talk to it. That’s boring. There’s no excitement in it. The conclusion is already well known. Instead, I wanted to show the process as it happened–so folks could see how fast and easy this is to do, and watch in real time to see what (if any) struggles I had. As a result, I needed something new to verify.
My first thought was to try Xilinx’s AXI
firewall.
This would be an ideal AXI core, since there was no more interface to it other
than AXI that I might get wrong. Sadly, this depended upon an encrypted
sc_util* package, so I had to move on and keep looking.
I next thought about verifying Xilinx’s Avalon to AXI bridge. This would also be pretty easy to verify, since I already have bus property files for both Avalon and AXI. Unfortunately, this depended upon their (encrypted) datamover IP, so I moved on again.
I also put some time into their AXI timer package. Surely this one would be simple enough for a basic demonstration, no? No. Sadly, for some reason, I wasn’t able to get the VHDL packages read into Yosys properly. I’m not quite sure what the problem was. Perhaps with a bit more work at it this might turn into a nice example later on, but I didn’t want to spend my day solving this problem–I was actually trying to do other work at the time.
I then turned to duckduckgo, and searched for open source AXI interconnects. Interconnects have two well defined interfaces, AXI slave interfaces and AXI master interfaces, to which I should be able to attach formal slave and master bus property files. I then found this repository, having an open source AXI interconnect within it. Sadly, this interconnect was run-time configurable. While such a programmable interconnect can certainly be verified, I would need to provide several assumptions to make certain it was programmed properly before expecting good behavior from it. For example, you don’t want to allow two master interfaces to be controlled from the same address range.
Not knowing quite how to handle this, I looked for any other designs in the same repository, and came across this axi_regs_top.sv AXI slave. Having been burned trying to get Xilinx’s designs into Yosys, I just double checked that Yosys could parse it. The open source version came close, but it ended up struggling at the three dimensional ports used by the design. However, the commercial version of Yosys that comes with the SymbioticEDA Suite could parse it just fine. Therefore, I figured this design might have some verification potential.
Again, my goal was to find a design which could be verified while others watched, to show how easy the process can be. So while I might still come back to any of these designs and put some more work into them, I was just looking for a quick demonstration that might be fun to share.
At this point, I tweeted my intentions and set up a Zoom meeting room for anyone who might want to join.
 |
Having never seen the design before, I wasn’t certain if it would have any bugs in it or not. Therefore, this was far from a canned demonstration. Worse, from a business standpoint, I was doing this all wrong: I didn’t take down any contact information, register participants, ask for market surveys, any of that. I didn’t even dress up in a suit or tie. That’s okay, I suppose, I mean … I wasn’t getting paid for this, and I’m already quite loaded on customers at this point. My goal was just to have a bit of fun.
Verifying the design
The Zoom chat started at 5pm local (Eastern) time. About a dozen individuals joined to watch. Yes, I’ll admit, I was kind of worried that no one would show up. The whole “event”, if you want to call it that, was set up with three hours notice. I’m sure more folks might have attended if they would’ve had more notice. My apologies to anyone who may have felt cheated out of a great opportunity–I was just out for some fun and perhaps to gauge a bit of interest. Was this something worth doing at all? Would it be something I enjoyed? If so, perhaps I should do it again. If not, oh well, at least I would’ve had a fun evening.
But for now, let’s turn our attention to the task at hand.
If you’ve never verified an AXI-lite slave before, it’s not that hard at all. There were just a couple of quick steps we went through.
The first step was to instantiate a copy of my AXI-lite slave properties within the design. This consisted primarily of just a lot of typing.
`ifdef	FORMAL
	localparam	F_LGDEPTH = 4;

	wire	[F_LGDEPTH-1:0]	faxil_rd_outstanding;
	wire	[F_LGDEPTH-1:0]	faxil_wr_outstanding;
	wire	[F_LGDEPTH-1:0]	faxil_awr_outstanding;

	faxil_slave #(
		.C_AXI_ADDR_WIDTH(C_S_AXI_ADDR_WIDTH),
		.C_AXI_DATA_WIDTH(C_S_AXI_DATA_WIDTH),
		.F_LGDEPTH(F_LGDEPTH)
	) faxil (
		.i_clk(s_axi_aclk),
		.i_axi_reset_n(s_axi_aresetn),
		//
		.i_axi_awready(s_axi_awready),
		.i_axi_awaddr(s_axi_awaddr),
		.i_axi_awvalid(s_axi_awvalid),
		.i_axi_awprot(3'h0),
		.i_axi_awcache(4'h0),
		//
		.i_axi_wready(s_axi_wready),
		.i_axi_wdata(s_axi_wdata),
		.i_axi_wstrb(s_axi_wstrb),
		.i_axi_wvalid(s_axi_wvalid),
		//
		.i_axi_bready(s_axi_bready),
		.i_axi_bvalid(s_axi_bvalid),
		.i_axi_bresp(s_axi_bresp),
		//
		.i_axi_araddr(s_axi_araddr),
		.i_axi_arvalid(s_axi_arvalid),
		.i_axi_arready(s_axi_arready),
		.i_axi_arprot(3'h0),
		.i_axi_arcache(4'h0),
		//
		.i_axi_rvalid(s_axi_rvalid),
		.i_axi_rready(s_axi_rready),
		.i_axi_rdata(s_axi_rdata),
		.i_axi_rresp(s_axi_rresp),
		//
		.f_axi_rd_outstanding(faxil_rd_outstanding),
		.f_axi_wr_outstanding(faxil_wr_outstanding),
		.f_axi_awr_outstanding(faxil_awr_outstanding)
	);
`endif
I then I built a quick SBY file to configure SymbiYosys.
[tasks]
prf
cvr

[options]
prf: mode prove
prf: depth 4
cvr: mode cover
cvr: depth 40

[engines]
smtbmc

[script]
read -formal axi_regs_top.sv
read -formal faxil_slave.v
prep -top axi_regs_top

[files]
axi_regs_top.sv
faxil_slave.v
If I recall correctly, this only took about 20-30 minutes, and it was mostly typing and boilerplate. I might’ve been able to go even faster if I wasn’t explaining what I was doing, but I was enjoying sharing and so I took my time to make certain that I explained what was going on and why I was doing what I was doing.
The first run took only 16 seconds from start to fail. It produced the trace shown in Fig. 1 below.
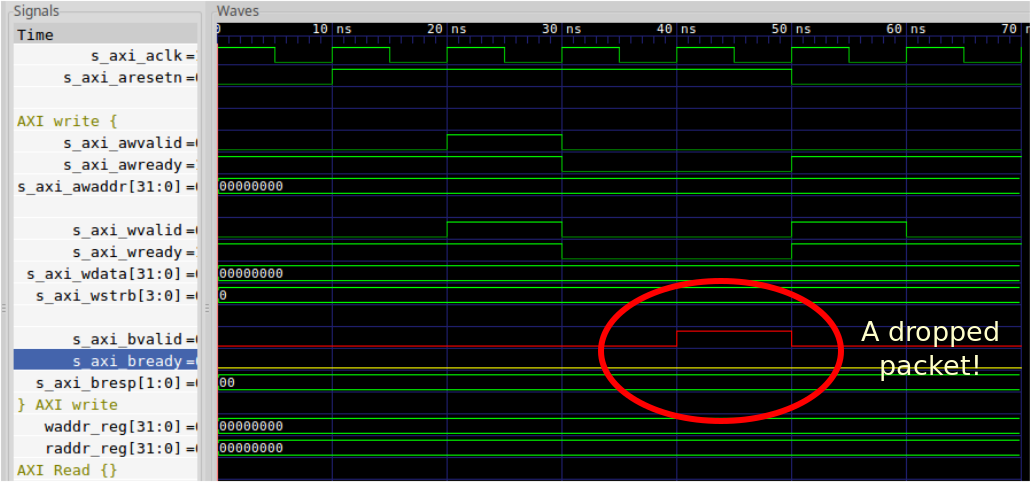 |
The “problem” the formal tools found is that BVALID is raised and then lowered
while the B* channel is stalled. This suggests that a packet might’ve been
dropped–until you look closer that is.
The actual problem is that this particular design uses an asynchronous reset.
Did you notice how the reset was asserted the same cycle that BVALID* dropped?
For many designers, this isn’t a bug but a feature or perhaps even a
requirement. From my standpoint, this is a setup problem: I hadn’t enabled
asynchronous reset checking in the formal property
file.
This was easily fixed,
	faxil_slave #(
		// ...
		.F_OPT_ASYNC_RESET(1'b1),
		// ...
	) faxil (
		// ...
and so I re-ran the proof.
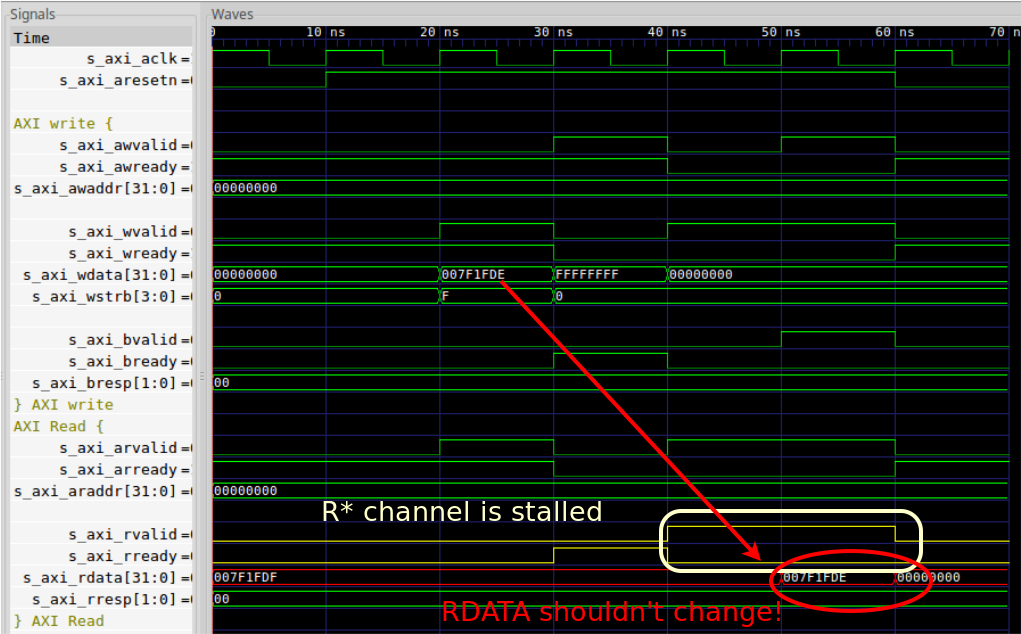
Re-running the proof a second time turned up another problem: The design
didn’t keep RDATA from changing while the R* channel was supposed to be
stalled. While it would be fun to declare the job done at this point
now that I had found the first bug, honesty isn’t that easy. As an engineer,
I need to know if the design I’m verifying is broken, or if instead somehow my
test setup is broken. Therefore, any failing trace needs to be investigated.
Perhaps this was just another setup bug like the asynchronous reset bug above.
Not this time.
In this case, it was a real bug, and I stumbled across what was going on when collapsing the AXI write channel view for a view of the AXI read channel: a register, controlled by the design, was being written to while the read channel was stalled. Since the design never latched read results but instead always produced the current value of the register being read–there was no protection against this fault.
 |
Having now found a first fault, I made an assumption that this would never happen again. Such an assumption has the unfortunate consequence of potentially hiding other failures, so you always have to be careful when doing this and to document it well.
	// BUG #1: AXI_RDATA might change when stalled
	always @(posedge s_axi_aclk)
	if (s_axi_aresetn && $past(s_axi_rvalid && !s_axi_rready))
		assume($stable(s_axi_rdata));
Here I documented it as bug #1 within the source.
I also try to place all assumptions like this at a known place, in a block at the end of the file, so I know where to find them when I come back to the design later. I label this block as “careless assumptions”, simply because they artificially constrain the proof in a way that may match reality.
I then ran SymbiYosys again a third time. This time, however, after over ten minutes, Yosys hadn’t found any bugs in a bounded model check of perhaps 8-10 steps. It was time to switch to induction.
 |
For those who might not know, I am a real fan of induction. I like it a lot. While a bounded model check can find problems in a bounded number of steps (only 8-10 timesteps so far), it can never prove that your design works for all time. Only induction can do that. Not only that, but some errors can only be found using induction: counter overflows, buffer overruns, timeouts, and so forth. These are important, so whenever possible I like to use induction.
 |
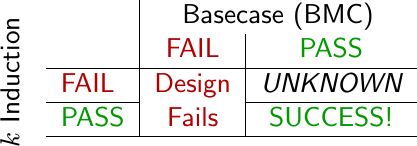
The problem with induction is that the induction engine can start your design in an unreachable state–one where the various registers within the design aren’t consistent. The engine might then go from there to breaking some assertion or other that would never be broken in real life.
I like to describe this concept using the blobology shown in Fig. 4. The green set of states are those which you want the design to reside within. The red blob are those states that are made illegal by assertions. The unbounded white area surrounding the entire design is made illegal by assumptions. That leaves the bounded yellow area. Yellow describes states your design can never get into. You normally don’t care about these states–you’ll never reach them via simulation. Not so with induction. The induction engine might start your design from one of these states, and then proceed to a state that you have specifically asserted is not possible.
 |
The solution to this problem comes from adding more assertions to the design–enough to eliminate the yellow unreachable area. These assertions will then keep the induction engine from starting out in such an unreachable state. The problem, though, is when you are looking at a design that isn’t yours: what assertions should you add?
To answer that question, I turned to cover(). The first pass with cover
wasn’t what I wanted: it just covered one read return or one write return.
So I went back to the formal property file and added in the F_OPT_COVER_BURST
option–setting it to find the first trace containing four writes as well
as the first trace containing four reads.
	faxil_slave #(
		// ...
		.F_OPT_COVER_BURST(4),
		// ...
	) faxil (
		// ...
The fact that cover() returns the first potential trace is important, because
it means you can use cover() to measure throughput as well. That comes for
free. In my case, I just wanted to see everything that took place within
the core
between one read or write request and the next. The throughput
measure was simply an added bonus on top.
You can see the trace generated to cover burst reads in Fig. 6, below.
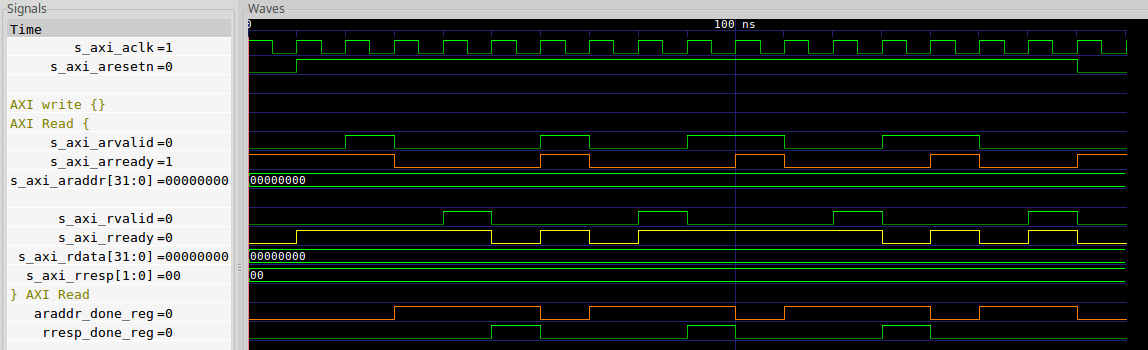 |
As you can see, it takes this core four cycles from one read request until it can accept the next one at its maximum speed.
I first chose to examine the read side, to see what was happening on each of
these four clock cycles. On the first clock cycle the read was accepted,
then there was an internal cycle to process the read, then RVALID was set,
cleared, and then finally ARREADY was set to allow a subsequent transaction.
While this is far from high speed, this wasn’t my own design–I was just
looking for AXI bugs. If you want a better design, use my easy AXI-lite
design
as a starting point.
Incidentally, if you want a better AXI (not lite) design, you can either use my AXI slave as a starting point or, if you’d rather work with AXI-lite, you can also start with my AXI to AXI-lite bridge. That bridge will feed an AXI-lite design with 100% throughput–allowing you to get full AXI performance from an AXI-lite interface. The cost? Two extra clock cycles and some buffers. Still, it’s quite usable. But … I digress.
Looking through the design, the first thing I noticed was that the design never allowed more than one transaction to be outstanding at a time. That’s easy to enforce, by just using the transaction counters from the formal AXI-lite properties.
	always @(*)
		assert(faxil_awr_outstanding <= 1);

	always @(*)
		assert(faxil_wr_outstanding <= 1);

	always @(*)
		assert(faxil_rd_outstanding <= 1);
Looking a bit further, I found some *done_reg signals that looked related
to the read channel’s processing. If you plot these signals out, you can
see a basic relationship between them–as shown at the bottom of the trace
in Fig. 6 above.
I quickly turned these relationships into a couple of assertions.
	always @(*)
	if (s_axi_aresetn)
		assert((araddr_done_reg && !rresp_done_reg) == (faxil_rd_outstanding == 1));

	always @(*)
	if (s_axi_aresetn)
		assert(araddr_done_reg || !rresp_done_reg);

	always @(*)
	if (s_axi_aresetn)
		assert(araddr_done_reg == !s_axi_arready);
I then turned around and repeated this process on the write side of the interface.
	always @(*)
	if (s_axi_aresetn)
		assert(awaddr_done_reg == !s_axi_awready);

	always @(*)
	if (s_axi_aresetn)
		assert(wdata_done_reg == !s_axi_wready);

	always @(*)
	if (s_axi_aresetn)
		assert((awaddr_done_reg && !wresp_done_reg) == (faxil_awr_outstanding == 1));

	always @(*)
	if (s_axi_aresetn)
		assert((wdata_done_reg && !wresp_done_reg) == (faxil_wr_outstanding == 1));

	always @(*)
	if (wresp_done_reg)
		assert(wdata_done_reg && awaddr_done_reg);
Curiously, if those X==Y assertions hold, for two separate registers X
and Y, then … why keep both registers around? I’d be tempted, if this
were my own design, to turn around and remove any extra registers after
seeing something like this–but we can do that after verification if we would
like.
When I returned to verify the core, held for the first ten time steps–past the first transaction and potentially even into the second. That was the good news. The bad news was that the induction engine suddenly slowed down after two steps. (I had it set for 10 steps. It counted down from 10 to 8 and … stopped.) After about a minute, it got to the next step, but the one after that required another five minutes.
This is unacceptable (in my humble opinion)–especially for a core this simple. I really don’t want to wait that long for a tool to tell me if my design is working or not–and especially not when doing this for a small audience. So I adjusted the depth again, this time from ten cycles down to four. After another ten minutes of processing or so, the tool produced a trace where the design had received an address, but hadn’t responded to the bus. It was a timeout bug. (Curiously, when I repeat this test without running Zoom, the tool returns within a minute.)
This didn’t happen in a bounded model check, what was going on?
A little more sleuthing discovered a set of rresp_running_reg registers
that I hadn’t noticed before. Looking over the cover traces, this register
looked like it was identical to the return valid signal. Therefore, I
created a couple of assertions to see if this was the case.
	always @(*)
	if (s_axi_aresetn)
       		assert(wresp_running_reg == s_axi_bvalid);

	always @(*)
	if (s_axi_aresetn)
		assert(rresp_running_reg == s_axi_rvalid);
Now, at this point, the design passed both the bounded model check and the induction pass within seconds.
But what about that bug? So far, we’ve only assumed we’d never hit it. Wouldn’t it make more sense to fix it?
So I added in a set of FF’s to actually latch RDATA and the design now
passed. Here’s what the design used to look like,
	// implement slave model register read mux
	always_comb
		data_out_reg <= cfg_reg[raddr_reg[7:0]];
and here’s what I updated it to:
	always @(posedge s_axi_aclk)
	if (araddr_done_reg && !rresp_running_reg)
		data_out_reg <= cfg_reg[raddr_reg[7:0]];
I then removed the assumption and re-ran the proof. Within only a couple of seconds, this design was now verified to be fully AXI-lite compliant.
In all, the whole effort took just over an hour: one hour and twenty minutes from start to finish. Remember, I started with a design I’d never verified before, and I didn’t know if there were bugs within the design or not. On top of that, most AXI-lite designs copy from a couple of base designs–such as Xilinx’s (broken) demo. This one didn’t copy from anywhere that I could tell, so it was a fun new approach to AXI-lite to examine.
Questions asked
During this hour, however, there was a lot of time where nothing was happening. During that time, I asked for and responded to a variety of questions posted on the Zoom chat channel. No, I didn’t record the event, nor did I record the questions posed over the chat channel. However, I can still remember some of the questions that were asked, and so let me share those again below.
-
Will I be recording a video of the event? or if not, would I allow someone else to record it?
My response here was, No, I was not going to be recording the event.
Video production is a field in and of itself. It’s not something I really have any experience with, and I’m not sure how well I’d be able to do it. Others, such as Matt, understand the topic and do a much better job than I expect to be able to do. Further, I wasn’t sure if this event would even be of any value and interest or not.
So, instead, I asked the audience to let me know at the end of the teleconference if this was something they found valuable and might want to see a video of in the future. If there’s an interest in it, perhaps I can do a bit of research into what would be required. Perhaps there might be some interest in an amateur hour, I don’t know.
One of the other individuals who joined us recommended Matt’s video on “Formally verifying an AXILite core with sby.” This video should cover the same (rough) material I covered, yet looking at a different AXI-lite core. If you’d like to watch a how-to video, I’d certainly invite you to check out this one.
-
What tool was I using for formal verification?
As I mentioned above, I was using SymbiYosys for the formal verification. You can also read about the open source tool suite I normally use when doing design here.
-
Do I always document my designs?
I try.
One of the things that comes with age is the recurring experience of returning to your own work, weeks or months later, and wondering what you were thinking when you wrote it. This is usually when I start adding in a lot of documentation, if not before. Similarly, if I ever have to think my way through a problem, then I am careful to document my train of thought lest I not remember it five minutes later.
I’ve also discovered that blogging about various designs is a great way to document them. The process of explaining a design to someone else forces me to think carefully through what I’m doing and why. In other words, I am not just blogging for my readers and sponsors, I also blog for my own benefit.
-
Does SymbiYosys come with GTKWave?
Yes and no. GTKWave is its own independent piece of open source software project. I have it downloaded on my computer, and I just use it from there. However, the commercial version of SymbiYosys, which comes as part of the SymbioticEDA Suite, comes prepackaged with a copy of GTKWave to ensure a uniform customer experience.
Technically, GTKWave isn’t required–any VCD viewer should work nicely with SymbiYosys. Practically, I don’t have experience with any other waveform viewing tools, so I’m not sure what more I can say there.
-
What tool do I use for the drawings on my blog?
I primarily use dia. It’s a basic vector graphics package. I really like it.
There is another tool out there called inkscape which is pretty nice as well. One of the things I like about dia over my experience with inkscape is that it’s easy to force all diagram element points onto a grid–something I haven’t figured out how to do with inkscape, or if it’s even possible with inkscape.
In this article, the traces were made using GTKWave. From there I took a screen snapshot, saved it as a PNG file, and then imported the file into dia in order to add any annotations.
I use LaTeX to generate my formal verification courseware, and Fig. 3 is simply a screen capture of a LaTeX table with some PSTricks used to make
k-Inductiongo sideways.The blobs in Figs. 4 and 5 were created using dia. If you check out my formal verification courseware, you’ll see that I use the same blobs there–albeit with a bit more explanation and context.
-
Are there any consequences to having too many assertions? Might a design vacuously pass?
This was a really good question. From the viewer’s perspective, it probably looked like I was just throwing random assertions into the design to see what would stick. Indeed, there was some truth to this as I was trying to get the design to pass induction. So what are the consequences here of being wrong? What if you add an inappropriate assertion? Or, alternatively, what if your assertions are redundant?
Let’s deal with the inappropriate assertion first. Suppose I make an assertion of something that isn’t really true. What happens then? That’s easy: the design will fail to prove. When the proof fails, SymbiYosys will generate a trace showing the problem, and you can then examine it to decide if the assertion was in error or if, instead, the design was in error. Indeed, that’s the whole purpose of formal verification: to find failing assertions.
It is also possible to assert the same thing more than once, or in multiple different ways. This isn’t really much of a problem though. While it might cause some small performance hit, your design still won’t pass when it shouldn’t–so you are still okay there.
 |
Where things get scary are with assumptions–not assertions. If you assume something you shouldn’t, then you might cause your design to pass vacuously. (i.e., it passes when it shouldn’t.) To keep this from happening, I have a rule that you should only make assumptions of inputs–never outputs nor registers internal to your design. Even at this, though, I’ve made mistakes where I’ve assumed things that weren’t true. My current best answer is to use custom interface files, so that everything that gets assumed on one side of an interface gets asserted on the other side. While this doesn’t work for all of my problems, when it does work it works amazingly well.
-
Where can I learn more about induction?
I have two good resources on induction for those who are interested. The first is my blog post on the topic, and the second are the formal verification class slides. Both will tell you a bit about how to do induction, and the unique problems associated with it.
-
Is there any way to get the tool to provide more meaningful names for cover traces other than just
trace%d.vcd?Not that I know of. I know I had asked for this feature some time ago. Looking over the issue tracker, it looks like Tom Verbeure also requested the feature. That request hasn’t yet been closed, so I think it’s safe to assume the feature doesn’t exist yet.
-
Why do you need to provide the counters to the bus interface property module?
This question was asked in reference to the three counters,
faxil_awr_outstanding,faxil_wr_outstanding, andfaxil_rd_outstanding. The immediate answer to the question is that I’m not providing them to the interface property module, but rather it’s the other way around: the interface property module is providing those counters as outputs to the rest of the design.Are they necessary? For a bounded proof, they can be left as internal counters within the interface property set. For an induction proof, however, you need to tie the registers within your design to these counters via assertions–or the proof won’t pass.
Go back and take another look at the assertions we made above to pass induction. See how this was done? First we asserted there would never be more than one transaction outstanding, then we came back and said that if there ever was a transaction outstanding then the
*_done_reghad to be set and the*resp_done_reghad to be clear. That’s an important part of making our formal proof valid for all time, as well as for accomplishing the whole proof in only four steps. -
Can I see some part of this design or other?
One of the challenging problems of working with a design that doesn’t fit on the screen is that there will always be viewers who can’t see some part of it that they are interested in. Since only the most trivial designs tend to fit on a screen at once, this means someone will always be struggling to follow–which is one of the reasons why I tend to dislike the video format for learning.
Still, in case anyone wanted to study the design or the formal properties I added to it, I placed a copy in a github gist. Feel free to check it out. There should be a decent comment block at the top of the SV file describing what we did. You might also wish to compare the result against the design we started from, to see any differences.
Conclusion
Ok, so I admitted it up front. I was just in it to have a fun evening. I didn’t write down any business contacts, I didn’t keep track of potential clients, I didn’t do any customer satisfaction surveys, or try to ask questions like if anyone had ever used formal before or not and why or why not. Neither did I dress up in a suit or tie, and those who showed up early may have even seen the soda can on my desk.
Towards that end, I think I succeeded.
Did my work help someone out? Probably not. I checked with Olof, who hosts this repository on github, only to find out that the authors had since rewritten everything and so I was only verifying abandonware. So, this wasn’t really all that much of a good deed for the community from that standpoint.
Now, let me ask you, my sponsors and readers, and especially those who were able to join me: is this something you’d like to see more of? Those who were there asked for more, but I’d love to hear your thoughts as well. Please let me know if so. To that end, I’ll post a link to this article on the ZipCPU Reddit–as I have with most of my articles, where you’ll be able to comment one way or another if you would like to weigh in on the question.
Oh, and one more thing: I might need some help finding some other open source AXI projects to verify for this purpose. Someone pointed me towards alexforencich’s repo as one possibility, and I’m also aware of the updated pulp-platform AXI repo, but I’ll need more than just those two in order to do this more than just a couple of times–assuming there’s sufficient interest for it.
And after the reading of the law and the prophets the rulers of the synagogue sent unto them, saying, Ye men and brethren, if ye have any word of exhortation for the people, say on. (Acts 13:15)