
Building a prefetch module for the ZipCPU
 |
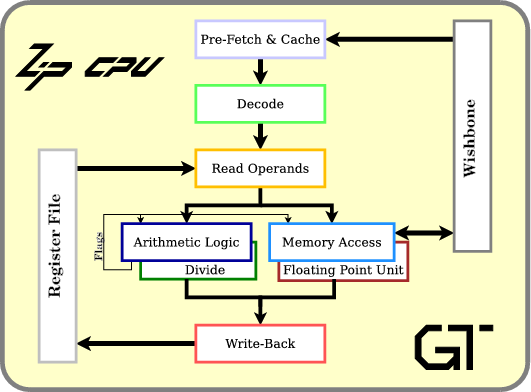
At its most basic level, any CPU works by fetching instructions from memory, acting upon those instructions, and repeating the process over and over again as shown in Fig 1. The ZipCPU is no different. It also needs to fetch instructions from memory and then act upon them in a tight loop.
However, while the ZipCPU accomplishes this same basic loop, the pipelining within the CPU might render these steps a touch more difficult to recognize. Indeed, the ZipCPU splits up the “do-instruction” into multiple pipeline steps,
while (!halted)
	Fetch instruction
	Decode instruction
	Read operand registers
	Do instruction
	Write results to registers
as illustrated in Fig 2.
 |
We’ve already discussed how the ZipCPU handles the do instruction stage within its arithmetic logic unit. We’ve also discussed how the ZipCPU handles the signaling between its pipeline stages. What we haven’t discussed is how the ZipCPU reads instructions from memory. This is accomplished by the prefetch unit.
The prefetch is that portion of a CPU that reads instructions from memory and presents those instructions to the rest of the CPU for execution. While today’s Wikipedia author’s argue that there’s a difference between an instruction fetch, which gets the next instruction from memory, and a prefetch, which fetches an instruction before it is needed, I’m going to equate the two terms under the single name prefetch for simplicity. The result of this abuse of terminology will be that I can describe all instruction fetch modules with the same term, but also that this subtle difference in meaning will be lost.
Using this common term, the prefetch is a critical component of any CPU because the CPU can only run as fast as it has instructions. A good prefetch unit, therefore, is optimized to keep the CPU’s pipeline filled with instructions.
The prefetch is so important to how the ZipCPU runs that the ZipCPU has had four prefetch units over time. The first of these, prefetch.v, simply fetches a single instruction and waits for the CPU to ask for the next instruction. This is the code we shall discuss below. The next prefetch version tried to keep the Wishbone pipeline full with memory requests while caching a window of memory. This prefetch has since been abandoned in favor of a more traditional combined prefetch and instruction cache version. (The Dhrystone benchmark was part of the motivation for this change.) The fourth version, one that fetches two instructions at a time, was written recently for a low logic application. It improves upon the simple prefetch by fetching two instructions back to back.
Today, though, we’re going to discuss the first of these
prefetch
units–the one that fetches only a single instruction at a time.
The ZipCPU can be caused to use this
prefetch
routine by defining the OPT_SINGLE_FETCH option within the
cpudefs.h
file.
Going from this simple
prefetch
to a better
prefetch
requires adding a
cache
and some other things–but it’s still built upon the basis of how to build a
single-instruction prefetch
unit
in the first place. For these reasons, the simple
single-instruction
prefetch
is well worth studying and understanding.
Further, since the ZipCPU’s prefetch module is a Wishbone master, this will be another opportunity to discuss how to build a Wishbone master interface. While the Wishbone slave interface is fairly simple, the master interface can be a touch more complicated. When we’re done, we’ll even formally prove that this interface works, thus showing you how to build a more generic Wishbone master. (We presented another version of how to build a Wishbone master earlier, as part of our debugging bus discussion.)
The CPU Interface
Any prefetch module must support two interfaces: both an interface to memory, as well as an interface to the CPU. Both of these interfaces are shown in Fig 3.
 |
We discussed the Wishbone interface at length in an earlier article. Today, we’ll introduce the interface with the CPU. If you remember our prior discussion on pipeline strategies, then you will probably recognize several examples of handshaking between pipeline stages as we go along.
Internally, a CPU keeps track of the address of the next instruction in a register known as the program counter. This counter normally changes in a one-up fashion from one instruction to the next. The common exception to this rule is when a branch takes place. Such a branch may be the result of a branch instruction, a jump to an interrupt service routine (ISR), or even a CPU reset request. In all of these examples, the CPU needs to command a memory read from a brand-new address of the prefetch unit.
Well, not quite. If you look through the
ZipCPU’s
source code,
you’ll find the address of the “current” instruction wandering
through the various pipeline stages as one of several registers:
pf_pc, pf_instruction_pc,
dcd_pc, op_pc, and alu_pc. The actual register that stores the
PC upon instruction
completion is either the ipc (supervisor
PC register) or the
upc (user PC register).
Inside the prefetch, the pf_pc is renamed as the
PC address request, i_pc,
and the address of the returned instruction, o_pc, is relabeled within
the CPU
as pf_instruction_pc.
 |
From the
prefetch’s
side of this interaction, nothing begins until the
CPU
raises the i_new_pc signal. When this signal is valid, the address of
the instruction that the
CPU
wants is captured in the i_pc input. The
prefetch
must respond to this input by fetching the instruction from the memory
address given by this i_pc input.
Once the new instruction has been read, the
prefetch
needs to do several things. First, it places that new instruction in the
o_insn output. Second, it places the instruction’s address into the o_pc
register. Finally, it sets the o_valid flag to let the
CPU
know that there’s a valid instruction ready for it. This flag is part of
a simple handshake
with the CPU.
As a result, it needs to be held high until the
CPU
also raises the i_stall_n line (a ready signal) to indicate that it is
ready to read an instruction.
Once (o_valid)&&(i_stall_n) are both true, the
prefetch
needs to drop the o_valid signal and fetch the next instruction from the
address given by o_pc+1 (counting in 32-bit words).
This continues until another
branch
takes place. When that happens, the
CPU
will communicate this to the
prefetch
by raising the i_new_pc signal. In response, the
prefetch
will drop the o_valid line
(even before i_stall_n is true), and fetch the next instruction and so the
cycle continues.
This is the basics of how this simple prefetch works. As with any FPGA project, however, we’ll need to pay close attention to the details.
For example, what happens when the
Wishbone bus
returns an error?
Suppose, for example, that the
CPU
tried to branch
to a non-existent memory address. In this case, the
bus
would return an error, and so the
prefetch
needs to return everything as before, only in this case it also sets an
o_illegal flag so that the
CPU
can recognize and properly respond to the invalid instruction.
Another corner case might seem more relevant for a
prefetch/cache
interaction than this simple
prefetch,
but it’s actually still relevant. In this example, the
CPU
instructs (or is instructed) to clear its
cache.
It may be, for example, that the
CPU
is halted and under the control of the debugger. The debugger may have
rewritten the memory the
CPU
is about to execute–but the
CPU
needs to know that the instruction that it has already read is no longer valid.
This is the purpose of the i_clear_cache line for even this simple prefetch
module.
When raised, the
CPU
is telling the
prefetch
that any instruction that has been read and is waiting for the
CPU
to issue is invalid, and thus needs to be read again.
Finally, what happens when the prefetch is given a new address while it is in the middle of requesting another address? In that example, the CPU needs to abandon (abort) its current transaction and initiate a new read to get the newly requested address.
These subtle details help to describe some of the more interesting cases when dealing with this (otherwise) simple prefetch. However, the operation is still simple enough that we might try to build it in a straightforward fashion–the topic of our next section.
Initial Attempt
Now that we know how this prefetch module is supposed to interact with both the bus and the rest of the CPU, let’s outline some of the detailed basics of how this might take place.
The process starts out with the bus idle. Similarly, on any reset request we’ll want to bring the bus back to this idle state again.
initial	o_wb_cyc <= 1'b0;
initial	o_wb_stb <= 1'b0;
initial	o_valid <= 1'b0;
always @(posedge i_clk)
if (i_reset)
	o_wb_cyc <= 1'b0;
	o_wb_stb <= 1'b0;
	o_valid <= 1'b0;
Since these two lines qualify all of the other
bus output lines
(prefixed herein with o_wb_*), all it takes to
end a bus cycle
is to lower these two wires.
What about any bus transaction in process when this reset is received? That was part of our discussion when we worked through a formal description of the Wishbone bus. Our conclusion, from that discussion, was that it is important to be able to abort a bus transaction at any stage in that transaction. Were we in the middle of a transaction, the logic above would simply abort that transaction as we’ve discussed.
The o_valid line initialized above isn’t part of the
bus
interaction.
As we discussed in the last section, this is the signal to the
CPU
that a valid instruction is ready to be read from the
prefetch.
This signal also needs to be reset, along with the
bus
interaction, so we
reset the o_valid at the same time above.
The next step is to recognize when a new transaction needs to begin. There
are three basic conditions indicating that we want to start a new
bus
interaction.
The first is if the
CPU
wants us to branch
to a new address. In this case, the
CPU will
have raised the i_new_pc signal and placed the new address in the i_pc
input. A new transaction also needs to begin any time the
CPU
accepts the instruction the
prefetch
presented to it. This condition is indicated by both an instruction being
valid, o_valid, at the same time the
CPU
is not stalled, i_stall_n.
end else if (!o_wb_cyc)
begin
	if ((i_new_pc)||((o_valid)&&(i_stall_n)))
	begin
		o_wb_cyc <= 1'b1;
		o_wb_stb <= 1'b1;
The address appropriate for this new
bus
request.
depends upon the reason for the request. If the
CPU
gives us a new instruction address, indicated by i_new_pc, then that
address is the memory address we need to fetch.
		if (i_new_pc)
			o_wb_addr <= i_pc;
On the other hand, if the last instruction was just accepted, then we want to grab the next instruction–found one address later.
		else if ((o_valid)&&(i_stall_n))
			o_wb_addr <= o_wb_addr+1'b1;
In each of these cases, the output instruction needs to be marked as no longer valid. If this were a branch, every other stage in the CPU pipeline. would be marking their data as invalid as well.
		o_valid <= 1'b0;
	end
The final section of this overview pseudocode discussion involves how the controller should respond while a bus interaction is taking place.
end else begin // if (o_wb_cyc)The first item to pay attention to during a
bus
transaction
is to insure that only one transaction request is issued. (Other
ZipCPU
prefetches issue multiple requests in quick succession, this
prefetch
only issues the one request at a time.) From the
bus definition,
we know that a transaction request has been accepted any time the master’s
STB signal is high and the slave’s STALL signal is low, or
(o_wb_stb)&&(!i_wb_stall). We can short-circuit this full test in this
simple implementation
by just setting o_wb_stb low anytime i_wb_stall is
low during a bus transaction. Should i_wb_stall be low when o_wb_stb
is already zero, then this statement will have no effect–as desired.
	if (!i_wb_stall)
		o_wb_stb <= 1'b0;
The second item to deal with is when to end our request. In this
single item
Wishbone master
the transaction ends on the first
bus
return. Hence o_wb_cyc is returned to zero following any i_wb_ack signal
from the memory slave peripheral.
	if (i_wb_ack)
	begin
		o_wb_cyc <= 1'b0;
On this same clock, we can set the value of the instruction, o_insn, to be
sent to the
CPU,
as well as the valid flag, o_valid, to indicate this instruction is valid.
		o_insn <= i_wb_data;
		o_valid <= 1'b1;
	end
end
This is the basic outline of how this prefetch module works. When we get into the details below, you will likely find them very similar to this discussion above. However, because breaking this one giant “always” block into multiple processes can reduce our logic requirements, you may not necessarily recognize the code above in the code presented below.
You’ll also see another difference below, associated with having to deal with some of the subtle details of the corner cases–things you may not expect unless you’ve had your CPU fail because you haven’t dealt with them. These will be the topic of the next section.
The Actual Prefetch Code
At this point, we’ve outlined how this prefetch module needs to interact with both the CPU, and the Wishbone bus. We’ve also outlined the basics of the module we’d like to implement above. The task left before us now is to finally implement the details of this module, and then to prove that it works below. In other words, it’s now time to get specific about those corner cases.
Since any
prefetch
is a read-only structure, we’ll set the
bus wires associated with writing to the bus to zeros, although only
the o_wb_we signal will be relevant since o_wb_data is ignored unless
we are within a write transaction and (o_wb_stb)&&(o_wb_we).
	assign	o_wb_we = 1'b0;
	assign	o_wb_data = 32'h0000;
Having dealt with the constants, we can now
turn our focus to the actual implementation of the logic
above. We’ll start with what’s left of the giant always block controlling
the bus wires o_wb_cyc and o_wb_stb. As before, we’ll start by
initializing ourselves into an idle state.
	initial	o_wb_cyc = 1'b0;
	initial	o_wb_stb = 1'b0;
Unlike before, we’ll also return to this idle state upon any bus
acknowledgement or
error.
These two signals need to be qualified by the o_wb_cyc line, since in our
last wishbone discussion,
we discussed
how either the i_wb_ack or the i_wb_err signal might be true on the clock
cycle after o_wb_cyc is dropped as part of an abort.
	always @(posedge i_clk)
		if ((i_reset)||((o_wb_cyc)&&((i_wb_ack)||(i_wb_err))))
		begin
			// End any bus cycle on a reset, or a return ACK
			// or error.
			o_wb_cyc <= 1'b0;
			o_wb_stb <= 1'b0;
The next task is to start a new bus request. There are several reasons for starting a new bus request:
-
If the last instruction was accepted, and it wasn’t the result of a bus error.
There should only be two ways out of a bus error condition.
The first way out of a bus error condition is by the CPU branching to a new instruction. Two examples will help illustrate this. The first example would be if the pipeline has gotten ahead of the CPU and read past the end of the memory device, but while the software program itself has not. Perhaps the last item of memory is a branch statement and the software hasn’t gotten that far, even though the pipeline is beyond it. The second example is that of a CPU branch in response to an error condition. This would be the case if the CPU actually tried to execute the instruction at the address that caused the bus error. In this case, we’d get a new request for an instruction, on an
i_new_pc, only the instruction address requested,i_pc, would be the address of the instruction error handler.The second way out of a bus error condition is via the
i_resetsignal above. -
We’ll want to start a new transaction if the last transaction was aborted. In this case, we’ll use an
invalidflag to indicate that the last bus transaction ended in an invalid manner—such as if the CPU issued us ani_new_pcsignal during a memory transaction. In this case, theinvalidflag is our memory that we need to start a new transaction to get that updated address. -
We’ll also start a new transaction following any branch to a new address, indicated by the
i_new_pcsignal. This differs from theinvalidversion above in that this request may take place while the bus is already idle.
In all three of these cases, a new
bus
transaction
is initiated by raising both o_wb_cyc and o_wb_stb lines high.
We’ll also need to adjust o_wb_addr at this time as well, but we’ll
come back to that later as part of its own always block.
		end else if ((!o_wb_cyc)&&(
				// 1.
				((i_stalled_n)&&(!o_illegal))
				// 2.
				||(invalid)
				// 3.
				||(i_new_pc)))
		begin
			// Initiate a bus transaction
			o_wb_cyc <= 1'b1;
			o_wb_stb <= 1'b1;
The next question is how to handle an ongoing bus transaction.
		end else if (o_wb_cyc)
		begin
We already dealt with any bus transaction aborts due to bus error’s above in the reset logic, so that leaves only two items to deal with. The first is dropping the strobe line once our request has been accepted,
			if (!i_wb_stall)
				o_wb_stb <= 1'b0;
and the second is aborting the transaction any time a branch request is received during the bus transaction.
			if (i_new_pc)
			begin
				o_wb_cyc <= 1'b0;
				o_wb_stb <= 1'b0;
			end
		end
In this latter case, invalid will be true on the next cycle to let us
know that we need to restart our
bus
transaction with a
new address. Here’s the logic associated with letting us know that an
aborted
bus
transaction
needs to be restarted.
	initial	invalid = 1'b0;
	always @(posedge i_clk)
		if ((i_reset)||(!o_wb_cyc))
			invalid <= 1'b0;
		else if (i_new_pc)
			invalid <= 1'b1;
The next value of interest is the address of the instruction we are
interested in. This address is set any time the
CPU
issues a new address via i_new_pc. In all other respects it is incremented
any time a valid instruction is accepted by the
CPU–with
the one exception to this choice
being the case of an illegal instruction resulting from a
bus
error.
In that case, the instruction address doesn’t change–and we don’t issue new
bus
requests
either.
	initial	o_wb_addr= 0;
	always @(posedge i_clk)
		if (i_new_pc)
			o_wb_addr  <= i_pc;
		else if ((o_valid)&&(i_stalled_n)&&(!o_illegal))
			o_wb_addr  <= o_wb_addr + 1'b1;
Since this is just a simple prefetch
module,
one that only returns a single instruction, we can re-use the
Wishbone address
lines, o_wb_addr, as instruction address lines when sending them to the
CPU.
assign o_pc = o_wb_addr;As for the instruction passed to the
CPU,
that’s one of the simpler things we need to do–especially since this
prefetch
version only requests one instruction at a time. We’ll set this value on any
valid bus
return, found in the i_wb_data word, and indicated by both the fact that
we are in a
bus
cycle (o_wb_cyc is high), and by the acknowledgement flag, i_wb_ack.
	always @(posedge i_clk)
		if ((o_wb_cyc)&&(i_wb_ack))
			o_insn <= i_wb_data;
The last step is to handle the two flags, o_valid and o_illegal, sent to the
CPU
to let it know if the instruction presented in the o_insn register is a valid
instruction or not.
Initially, the instruction wires will always be invalid.
	initial o_valid   = 1'b0;
	initial o_illegal = 1'b0;
Likewise, following any reset, branch, or clear cache request, we’ll need to mark the instruction as invalid as well.
	always @(posedge i_clk)
		if ((i_reset)||(i_new_pc)||(i_clear_cache))
		begin
			// ....
			o_valid   <= 1'b0;
			o_illegal <= 1'b0;
We’ll also want to mark the instruction, o_insn, as valid immediately
following any bus acknowledgement, i_wb_ack. Since this acknowledgement flag
is only valid during a bus cycle (and may accidentally show up after a bus
cycle, as the result of an abort), we’ll have to check o_wb_cyc as well
to know if we need to set this.
Further, as we mentioned above, the !o_illegal signal is being used as an
indicator that the result of the bus request is a valid instruction versus
just being a valid response. Hence, if this was the result of a
bus
error,
we need to set o_illegal at the same time we set o_valid.
		end else if ((o_wb_cyc)&&((i_wb_ack)||(i_wb_err)))
		begin
			// ...
			o_valid   <= 1'b1;
			o_illegal <= ( i_wb_err);
Once the CPU
accepts our instruction, that is once (o_valid)&&(i_stalled_n) are both
true, then we need to clear the o_valid flag, lest the
CPU
accidentally read the same instructions twice.
		end else if (i_stalled_n)
		begin
			// ---
			o_valid <= 1'b0;
While you might be tempted to clear the o_illegal flag as well, doing so
would be a mistake. In particular, you want to keep the
prefetch
from trying to fetch, refetch, and refetch again, any response that was returned
in error.
Hence, we’ll leave o_illegal flag true following any
bus
error,
and use it as a flag (above) to keep us from re-initiating a new
bus
request
prior to a new PC
being given to us to recover from this error condition.
			// o_illegal <= (!i_stalled_n);
		end
One item worth noting about the code above, is that the giant always blocks
that remain only control a small number of signals. The largest groups of
signals within this design are associated with the
Wishbone address,
o_wb_addr, and the
output instruction, o_insn. These two groups of signals depend upon only
a minimum number of inputs, helping to keep our logic to a
minimum. The
registers that require complex logic, such as o_wb_cyc, o_wb_stb,
o_illegal or even o_valid, are all single registers–minimizing the
impact of any difficult logic on our overall core.
Formal Verification
Now that we know how this prefetch component interacts with the ZipCPU, and now that we’ve presented the how’s and the why’s of the logic within it, it’s now time to take a look at formally proving whether or not it does what we are expecting. We’ll separate this section into four subsections below: assumptions about logic coming from the CPU, assumptions about logic coming from the Wishbone bus, assertions about logic controlling the Wishbone bus, and then assertions about or logic used to communicate with the CPU, As before, the basic rule of formal verification remains: assume properties of inputs, assert properties of outputs.
Assumptions about logic coming from the CPU
There are four basic control lines coming from the
CPU
that the
prefetch
needs to interact with: the reset line, i_reset, the
branch
indicator line, i_new_pc, the request for us to clear our cache,
i_clear_cache, and the
CPU’s
ready (not stalled) line, i_stall_n. The fifth input from the
CPU
i_pc, is only relevant when i_new_pc is valid.
We’ll start out with a standard assumption: Everything begins in a reset state.
initial `ASSUME(i_reset);You may remember the ASSUME macro from my first experiences with
formal methods. This
macro is set to assume inputs from another part of the design only when
we are tested in isolation, and to assert those same properties any time
we are tested as a component of a larger interaction. The macro itself
is defined within the
prefetch
source code.
Moving on, we also know that, following any reset request from the
CPU,
the first thing the
CPU
will do will send us an i_new_pc command–requesting a read from the
reset address.
	always @(posedge i_clk)
		if ((f_past_valid)&&($past(i_reset)))
			`ASSUME(i_new_pc);
The same is true of the i_clear_cache signal. The
CPU
will always follow this signal by an i_new_pc request.
	always @(posedge i_clk)
		if ((f_past_valid)&&($past(i_clear_cache)))
			`ASSUME(i_new_pc);
Now let’s look at the i_stalled_n signal. This signal comes from the
CPU
and tells us when the
CPU
is not stalled. This is a handshake signal, much like the !busy signal
we discussed when we discussed pipeline
strategies.
Hence, the only time this signal matters to us is when o_valid is true. We
can still constrain it however.
The first constraint on this signal is that following any reset, the rest of the CPU will be idle. Stages beyond this one cannot be busy following a reset.
	always @(posedge i_clk)
		if ((f_past_valid)&&($past(i_reset)))
			`ASSUME(i_stalled_n);
The next constraint on this signal is that the CPU cannot suddenly become stalled without being given an instruction. Stalls only take place when there’s an instruction in the following stage that is taking more than one clock to execute–they can’t happen without an instruction. Hence, if the CPU wasn’t stalled on the last clock, and we didn’t pass the CPU an instruction on the last clock, then it cannot be stalled on this clock.
	always @(posedge i_clk)
		if ((f_past_valid)&&($past(!o_valid))&&($past(i_stalled_n)))
			`ASSUME(i_stalled_n);
Our last criteria isn’t so much a characteristic of the CPU, but rather one required by the proof. In order for induction to be successful, all of the various states need to be flushed within a given number of clocks. To make certain this happens, we’ll insist that the CPU can only be stalled for less than four clocks.
localparam F_CPU_DELAY = 4;In practice, the CPU, can be stalled for much longer. Divide instructions, for example, will stall the entire pipeline for 32+ clocks. This is just about speeding things up enough so that the solver can prove a solution.
To make this limit, we’ll first count the number of clocks we need to wait for the CPU, to be receptive to our instruction.
	always @(posedge i_clk)
		// If no instruction is ready, then keep our counter at zero
		if ((i_reset)||(!o_valid)||(i_stalled_n))
			f_cpu_delay <= 0;
		else
			// Otherwise, count the clocks the CPU takes to respond
			f_cpu_delay <= f_cpu_delay + 1'b1;
Finally, we’ll assume that this number remains less than the parameterized (but fixed) delay above.
	always @(posedge i_clk)
		assume(f_cpu_delay < F_CPU_DELAY);
Further, we’ll caveat this last test so that it will only take place if the prefetch is being tested in isolation, and not require it any time the prefetch is being tested as part of the CPU.
Those are the assumptions we need to make regarding how the CPU controls this prefetch module. In many ways, these assumptions form the CPU’s side of a contract: the prefetch will work as long as the CPU, and the Wishbone bus which we’ll discuss next, keeps its end of the contract.
Assumptions about logic coming from the Wishbone bus
Making assumptions about the Wishbone bus, however, is now really easy. Because we put together a module describing the properties of the Wishbone bus, we only need to include that module to get a copy of all of the various assumptions (and assertions) associated with interacting with this bus.
Once included, and given that our proof succeeds, we will then know that we are interacting validly with any peripheral on the Wishbone bus.
	fwb_master #(.AW(AW), .DW(DW),.F_LGDEPTH(F_LGDEPTH),
			.F_MAX_REQUESTS(1), .F_OPT_SOURCE(1),
			.F_OPT_RMW_BUS_OPTION(0),
			.F_OPT_DISCONTINUOUS(0))
		f_wbm(i_clk, i_reset,
			o_wb_cyc, o_wb_stb, o_wb_we, o_wb_addr, o_wb_data, 4'h0,
			i_wb_ack, i_wb_stall, i_wb_data, i_wb_err,
			f_nreqs, f_nacks, f_outstanding);
There are a couple of options we set above, however. These include the size
of the address bus and data bus, as well as the log (based two) of the length of
any interaction (F_LGDEPTH=2). We also indicated that this would be a source
controller (CYC&STB go high together), and that we will only ever make one
request of the bus (F_MAX_REQUESTS(1). Since the
prefetch
isn’t involved in writes, we can leave
the read-modify-write option off (F_OPT_RMW_BUS_OPTION). We’re also
not going to be restarting requests while CYC is high, so we can leave
the F_OPT_DISCONTINUOUS option low.
This part is just that easy: include assertions and assumptions from elsewhere and we’re done. Well … almost. We still need to make certain that the number of requests and acknowledgements counted by this formal description of a Wishbone master match the logic within our prefetch module. That’s coming up in the next section.
Assertions about logic controlling the Wishbone bus
We’ve now finished with the assumptions about our inputs. It’s now time to turn to look at any assertions we wish to make about our outputs. We’ll start with the assertions about the Wishbone bus.
Our first assertion is that we are reading only from the bus. This may seem silly, but … a prefetch should never do more than read from a bus. It’s worth knowing that that’s all we are going to do.
	always @(posedge i_clk)
		if (o_wb_stb)
			assert(!o_wb_we);
We’re also going to assert that, two clocks after an i_clear_cache request,
we’ve abandoned any ongoing
Wishbone
transaction.
	always @(posedge i_clk)
		if ((f_past_valid)&&($past(f_past_valid))
				&&($past(i_clear_cache,2))
				&&($past(o_wb_cyc,2)))
			// ...
			assert((!$past(o_wb_cyc))||(!o_wb_cyc));
Why two clocks? Well, the first clock should be the i_clear_cache request.
The second clock should be the i_new_pc signal. Then, on the third clock,
the o_wb_cyc should be indicating that we are within a transaction.
Once we have a valid result (instruction) to present to the
CPU,
then the address of this result shouldn’t change, neither should the instruction
itself–as long as we are holding o_valid high. Since this address is our
reference for the next instruction address, we can’t allow this to change
until the next bus cycle.
	always @(posedge i_clk)
		if ((f_past_valid)&&($past(o_valid))&&(o_valid))
			assert($stable(o_wb_addr));
We’re also going to assert that we start a
bus cycle
following any abort. Since invalid will be true following any abort based
upon a new PC,
this assertion captures the logic in question.
	always @(posedge i_clk)
		if ((f_past_valid)&&($past(!i_reset))&&($past(invalid)))
			assert(o_wb_cyc);
Those are the things we need to assert regarding our bus interaction–things specific to this prefetch.
Assertions about logic responding to the CPU
The last set of assertions are those associated with our responses to the CPU. These are primarily about the integrity of our return signals.
Since this is a single instruction prefetch
module,
after the
CPU
accepts an instruction we’ll have to go get a new instruction.
This means that the o_valid line must immediately drop–at least until the
next instruction is received.
	always @(posedge i_clk)
		if ((f_past_valid)&&($past(o_valid))&&($past(i_stalled_n)))
			assert(!o_valid);
We can go further and insist that any time we are within a
bus
cycle,
the o_valid line must also be low. Consider the consequences if this weren’t
the case: if the
prefetch
were allowed to present a valid instruction to the
CPU,
and a new instruction was received from the
bus,
where should it be stored?
	always @(*)
		if (o_wb_cyc)
			assert(!o_valid);
Further, any time we get an instruction from the
Wishbone bus,
we need to assert that we are telling the
CPU
that we have a valid instruction on the next clock cycle–the first cycle
that o_insn is valid.
	always @(posedge i_clk)
		if ((f_past_valid)&&(!$past(i_reset))
			&&($past(o_wb_cyc))
			&&($past(!i_clear_cache))
			&&($past(i_wb_ack))&&(!$past(i_wb_err)))
		begin
			if (!invalid)
				assert(o_valid);
		end
Of course, following an i_new_pc or i_clear_cache request, we’ll need
to make sure that the instruction presented isn’t valid.
	always @(posedge i_clk)
		if ((f_past_valid)&&($past(i_clear_cache)))
			assert(!o_valid);
Not only that but two clocks following an i_clear_cache request we want
to make certain we are still invalid. This makes sure we don’t abort
a bus cycle
and somehow turn on the o_valid signal.
	always @(posedge i_clk)
		if ((f_past_valid)&&($past(f_past_valid))
				&&($past(i_clear_cache,2))
				&&($past(o_wb_cyc,2)))
			// ...
			assert(!o_valid);
You may remember the discussion regarding two clocks past the i_clear_cache
signal above, having to do with the o_wb_cyc output. This is really just
an assertion of (roughly) the same thing.
Now let’s start looking at the content of what we are returning to the
CPU.
As long as we are presenting a valid instruction to the
CPU,
and the
CPU
is stalled and not ready for the instruction, then we need to continue
presenting our valid instruction.
Exceptions to this rule include the clock following any i_reset, i_new_pc,
or i_clear_cache request.
	always @(posedge i_clk)
	if ((f_past_valid)&&(!$past(i_reset))
			&&(!$past(i_new_pc))&&(!$past(i_clear_cache))
			&&($past(o_valid))&&(!$past(i_stalled_n)))
		assert($stable(o_valid));
Further, any time we present a valid instruction for two clocks in a row,
none of the information associated with that instruction should be able
to change. This goes for not only the instruction itself, o_insn, but
also the address of the instruction, o_pc, and the
bus
error
indication signal o_illegal. Another way to say this would be to say that
these lines shouldn’t change until the
CPU
acknowledges them.
	always @(posedge i_clk)
	if ((f_past_valid)&&($past(o_valid))&&(o_valid))
	begin
		assert($stable(o_pc));
		assert($stable(o_insn));
		assert($stable(o_illegal));
	end
The o_illegal line needs to remain valid even after the instruction has
been accepted–at least until the next i_new_pc command, since we are using
it as an indication not to refetch an instruction that is no longer
o_valid. Indeed, as long as o_wb_cyc remains low (with exceptions),
o_illegal needs to remain unchanging.
	always @(posedge i_clk)
	if ((f_past_valid)&&(!$past(i_reset))
			&&(!$past(i_new_pc))&&(!$past(i_clear_cache))
			&&($past(!o_wb_cyc)))
		assert($stable(o_illegal));
That leaves us with two more assertions, both about the returned address,
o_pc.
The first of these address assertions is that, unless the CPU tells us otherwise, we need to walk through the instruction stream one address at a time. There are a couple parts to making this assertion. We’ll need to keep track of anytime we have a valid past PC address to compare against.
	initial	f_last_pc_valid = 1'b0;
	always @(posedge i_clk)
		if ((i_reset)||(i_clear_cache)||(i_new_pc)||(invalid))
			f_last_pc_valid <= 1'b0;
		else if (o_valid)
			f_last_pc_valid <= (!o_illegal);
On any o_valid signal, we have a valid
PC to load into our
comparison register.
	always @(posedge i_clk)
		if (o_valid)
			f_last_pc  <= o_pc;
There’s a trick to making this work, though, and that is that we can’t allow
the f_last_pc register to be just anything–even when it isn’t being
referenced. This is a requirement of the formal induction step which will start
in any random (valid) state. Without the assertion below, the induction
step might start with an unreasonable f_last_pc value, and then conclude that
our code
was in error.
		else if (f_last_pc_valid)
			assert(o_pc == f_last_pc + 1'b1);
Finally, we’ll make this first assertion associated with the output
address, that following any valid instruction and without an intervening
i_new_pc, the next address must be one more than the last address.
	always @(posedge i_clk)
		if ((f_past_valid)&&(o_valid)
				&&(!$past(o_valid))&&(f_last_pc_valid))
			assert(o_pc == (f_last_pc + 1'b1));
That’s the first of the two address based assertions.
The second of these two assertions is a more complete assertion, this time
dealing with the address of the next request. In this case, we keep track of
the last address requested by the
CPU
in f_req_addr and increment it on any
bus
acknowledgement.
	initial	f_req_addr = 0;
	always @(posedge i_clk)
		if (i_new_pc)
			f_req_addr <= i_pc;
		else if ((!invalid)&&(o_wb_cyc)&&(i_wb_ack)&&(!i_wb_err))
			f_req_addr <= f_req_addr + 1'b1;
Now, any time a value is being requested from the
bus,
it should be the value found within f_req_addr.
	always @(posedge i_clk)
		if (o_wb_cyc)
			assert((invalid)||(f_req_addr == o_wb_addr));
This is the last assertion we need to test o_wb_addr, but as with the last
address assertion, this assertion isn’t sufficient. In particular, if we don’t
constrain it further, the induction step might assume that the f_req_addr
has a random value (since we haven’t told it otherwise), and then draw
an invalid conclusion as a result. Hence we’ll need to assert that if the
bus
isn’t active, then the f_req_addr must be the same as the bus address.
		else if ((!o_valid)&&(!i_new_pc)&&(!i_reset))
			assert(f_req_addr == o_wb_addr);
As a last assertion, we’ll insist that the invalid signal only ever be
true for a single clock.
	always @(posedge i_clk)
		if ((f_past_valid)&&($past(invalid)))
			assert(!invalid);
`endif
endmodule
This ends the list of assertions used to prove that the single instruction prefetch works as designed.
Minimizing Logic
If you are not familiar with the ZipCPU, you should know that one of the reasons why I built the ZipCPU was to allow me to experiment with CPU design on really cheap FPGA hardware (Ex [1] [2] [3] [4] [5] [6]). Achieving this goal required me to pay a lot of attention to logic minimization. It also means that any time I walk through my own code, I am forever asking myself, “is this wire needed?” “Can I remove the dependence of this flip-flops on this logical condition?” Doing this, though, requires two specific capabilities from my tool set.
First, I need to be able to know, of a certainty, any time I adjust a piece of logic, that the module will continue to work as designed. This is the purpose of the formal model checks above, and/or any test benches I might use.
Second, I also need to be able to know how many
LUTs,
flip-flops,
and so forth my logic uses. Traditionally, I have been using
Xilinx’s
ISE
or Vivado
to build my entire design and then to report to me the logic used by the
design. This can take a long time time (10+ minutes). On the other hand, as
part of putting this post together, I discovered that I can use
yosys with either the synth_xilinx (for
7-series FPGAs),
synth_ice40, or (hopefully soon) the synth_intel (for
Altera chips) command to then be able to
estimate the logic required. Below, for example, is the
yosys
output from processing the
prefetch.v
file above with synth_xilinx enabled.
   Number of wires:                 63
   Number of wire bits:            301
   Number of public wires:          20
   Number of public wire bits:     200
   Number of memories:               0
   Number of memory bits:            0
   Number of processes:              0
   Number of cells:                167
     FDRE                           67
     LUT1                            1
     LUT2                            1
     LUT3                           32
     LUT4                            4
     LUT5                            1
     LUT6                            2
     MUXCY                          29
     XORCY                          30
Indeed, I was pleased to discover that the number of LUTs required by this prefetch went down as a result of building a formal proof of this prefetch.
This prefetch only fetches one instruction
The presentation above demonstrated how one of the ZipCPU prefetch modules was put together. As I mentioned above, the ZipCPU’s has three other prefetch modules (although only two are actively maintained). This is also the first, and in many ways the simplest, of the prefetch module’s the ZipCPU has had.
Why did I switch?
I switched from this prefetch module to another when I watched how fast the pipelined ZipCPU performed when using this prefetch module. Indeed, the performance was so pitiful it was almost unbearable to watch the instructions flow through the pipeline–with never more than one instruction in the pipeline at any given time. Eventually, I measured the ZipCPU’s performance against the Dhrystone benchmark. Using a prior version of this prefetch module, the ZipCPU managed to achieve 0.128 DMIPS/MHz–a pitiful score. The score, however, should be compared with the 0.95 DMIPS/MHz score the ZipCPU achieved when fully pipelined. [Ref]
Since that comparison, however, the ZipCPU has been extensively modified–to include adjusting this prefetch. As a result of one of those changes, this prefetch. will now start fetching a new instruction a new instruction as soon as the CPU has accepted the last one, rather than waiting for the CPU to flush the last instruction through the pipeline before starting the next fetch. As a result, while it’s still painful to watch this prefetch operate, it’s not nearly as bad as it was originally.
If you like this blog, please consider supporting it on Patreon. Thank you!
And now I have told you before it come to pass, that, when it is come to pass, ye might believe. (John 14:29)