
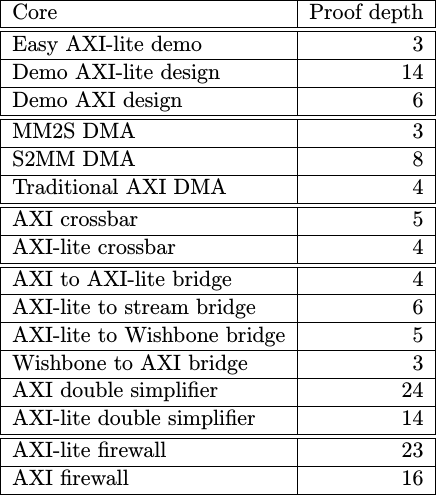
Building a Protocol Firewall
Ever since finding bugs in Xilinx’s AXI implementations, I’ve been wary of seeing these bugs again. [1] [2] I’ve certainly found copies of these same bugs in many user cores. I’ve also found quite a few other bugs in user cores. Indeed, it seems like AXI is just a hard bus to get things right with.
How then should a user build a working bus slave?
 |
Well, the obvious answer is by using formal methods. If you are interested in that road, you are welcome to try out my formal properties for Wishbone, AXI-lite, or even Avalon-MM. You can also purchase my AXI formal property set from Symbiotic EDA. If you’d rather, you can also purchase my time to look at your design, and run the formal tools on it for you.
Even when using formal methods, however, things can still be a challenge. An AXI4 transaction can have up to 256 beats to it. At best that requires a clock for a reset, another clock for the address request, and 256 clocks to transfer data. If you want to check what happens with back pressure, you might want to check twice that many cycles. Sadly, even at my best, I haven’t managed to exhaustively search through that many time steps using formal methods. AXI just happens to be particularly complicated.
 |
This forces any complete AXI proof to use induction. Using induction I can complete a proof for all time with many fewer clock ticks, as shown in Fig. 2 on the right. The problem with induction, though is that you need to add a lot of extra assertions into the design to make certain it can pass induction. This can be a real challenge, especially as the core becomes more and more complex.
Sometimes, you don’t get a choice. For example, the DMAs and crossbars I wrote were so complex that I had to limit the depth as short as I could. Were their proofs any longer, I’d lose interest in the results before they came back.
Just how long is too long for me? Well, remember, when you first start with a proof the solver finds bugs very quickly. It might find the first bug in two seconds. Then after a bit of work you’ll start to spend a lot of time at 30 seconds or so. Only as you start getting close to a working solution does the proof starts to take longer and longer, and so I find I then need to start trimming the induction depth more and more. In the end, the memory to memory DMA requires an hour to complete the proof for aligned transfer and nearly four hours to verify the core in it’s configuration where it can handle unaligned transfers.
Most proofs are simpler than that, but AXI happens to be rather complex.
Now let me ask, is this induction check worth it?
 |
Given that I still keep finding bugs in cores when I use induction, I would argue that it is, although you do end up with diminishing returns. Most of the “bugs” you will find when using induction tend to be bugs related to missing assertions. These are just frustrating, leaving you wonder if your time is well spent. However, I’ve found counter overflow errors, FIFO overflow errors, and more when using induction. These are important errors to find.
However, what if you can’t formally verify the core you are working with? What if you are working with a piece of vendor IP that you have no insight into? Who knows, maybe it’s encrypted. Given what we’ve discovered from Xilinx’s IP already, you will need another approach. Similarly, if you ever want to partially reconfigure an FPGA and have some ability to protect the upstream bus from the (not-yet-properly configured) downstream logic, you could place a bus fault isolator into the mix. Finally, what happens if you want to talk off chip and you want to place a bus component off chip. How should you be able to handle what happens if the off-chip slave is either off-line or being reconfigured? How shall the rest of the design be kept from locking up?
Enter the bus fault isolator, sometimes known as a bus firewall.
Bus Fault Isolators
 |
As shown in Fig. 4 on the right, a bus fault isolator is a bus adaptor having a trusted slave interface on one side, and an untrusted master bus interface on the other. It’s used to protect a bus from a faulty slave.
Here’s the basic idea:
 |
-
If the slave follows protocol, there should ideally be no difference between using the bus fault isolator and not using it, as shown in Fig. 5 on the left. Bus requests are passed through the bus fault isolator unchanged, and responses are returned upstream without modification. Indeed, in this case, the firewall is just a passthrough device.
Practically, there will be a minimum of some timing differences. My AXI bus fault isolator also restricts the number of outstanding downstream bursts to a single one alone, and this restriction can have some other complications–possibly even preventing any potential downstream bug from appearing.
 |
-
If, on the other hand, the slave ever tries to break protocol, then the bus fault isolator …
a. Disconnects the slave from the bus as shown in Fig. 6 on the right
b. Raises a flag on an external output which can be used to stop a logic analyzers capture allowing you to debug the problem
c. Returns a bus error for the failing transactions, for all outstanding transactions, and then for any future transactions
d. Optionally, the bus fault isolator can be configured to reset the broken slave
You can get a feel for what this might look like from Fig. 7 below. Follow the numbers, since the logic flow appears to jump from one line on the trace to another. I’ve tried to add some lines and arrows to help make it clearer.
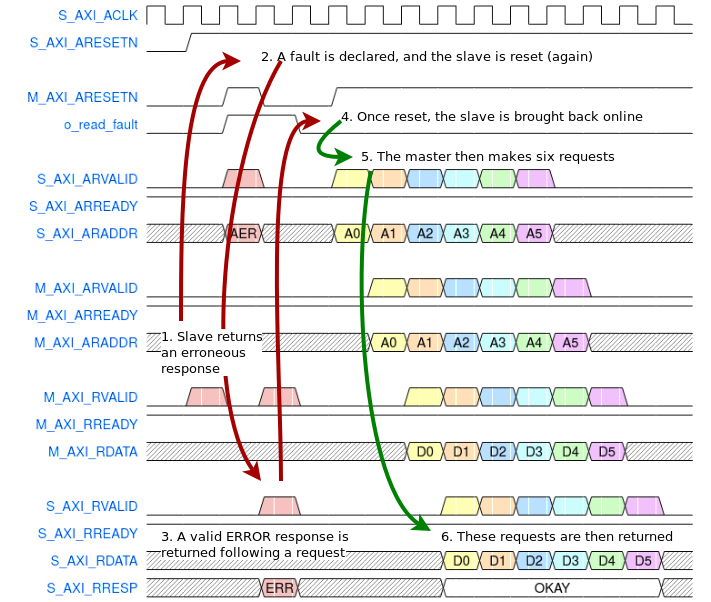 |
Fig. 7 shows an example of what might happen were a fault to be detected on an AXI-lite slave link. In this example, the AXI-lite fault isolator has been configured to reset the AXI-lite interface on a failure. Very early on in this trace, the downstream bus tries to return an unrequested response. A fault is detected. The downstream AXI-lite core then gets reset again. During this reset, any AXI-lite request from upstream returns a bus bus error, as shown in step 3. Once reset, the core is then reintegrated back into the design until its next fault.
What kind of errors should a bus fault isolator like this be able to detect? Well, ideally they should be able to detect any error caught by the formal protocol checking properties. This includes the classic errors:
-
Acknowledgments without requests, such as Intel’s AXI3 demonstrator produced. (Intel’s core did require a request, it just might respond before the request was complete and all write data was received.)
The error shown above in Fig. 7 represents an error of this type. This class of errors is a touch unusual, since a slave such as the bus fault isolator appears to the rest of the bus can only return a bus error response in response to a bus request. Don’t be too surprised, therefore, if a fault is detected without a bus error response.
-
Missing acknowledgments, such as both Xilinx’s demonstrators and Intel’s demonstrator’s struggled with or even as Xilinx’s ethernet core struggled from.
To catch a missing acknowledgment, the bus fault isolator needs an optional timeout parameter. If set to a non-zero value, it will insist that all bus responses take place within that period of time. Responses that take longer will result in a detected bus fault and return a bus error back upstream.
-
Other errors, such as the wrong ID being returned for a given request, or RLAST getting set before the end of the burst also need to trigger a fault. In the case of AXI-lite, the fault isolator will catch faults such as an EXOKAY response being returned on any request.
That’s an amazing set of requirements. There’s only one problem: they’re impossible to meet.
I came across a couple problems when implementing my bus fault isolators. In particular, it takes a clock period to detect an error. Further, AXI’s requirement that signals cannot depend combinatorially on any inputs means that the fault isolator must take a clock tick or two for its translation. Finally, my AXI bus fault isolator can only handle a single burst outstanding at any given time.
Still, even with its limitations, a bus fault isolator can be quite valuable. Consider, for example, this user who is struggling to figure out why Xilinx’s AXI XDMA core locks up on him. The trace, showing the last valid burst before this lockup is shown in Fig. 8 below.
 |
Traces like that make me wonder, was there a protocol error in that trace? It’s hard to tell at this resolution, and even if you were to zoom in to a usable resolution, you’d have a lot of counting to do in order to know. A bus fault isolator would reveal such a bug, allowing you to separate which of the two pieces of IP is potentially at fault.
In this case, the limitations of the AXI bus fault isolator wouldn’t bother you: the core in question appears to only ever request one burst at a time, so it would ideally be useful for finding this kind of bug.
Verifying a Bus Fault Isolator
One of the things that makes a bus fault isolator unique is the form of its proof. First, the proof requires a bus property set. This should come as no surprise. We’ve described building a bus property set for Wishbone, and again for AXI-lite. You’ll need a bus property set like one of those to do this. Further, the proof is tightly tied to the property set and dependent upon it. For example, the timeout counter logic must almost exactly mirror that of the property set. Once set up, then two proofs are required.
- Assuming the slave behaves and follows the requirements of the bus protocol as outlined in the bus properties, you need to prove that no fault will be detected and all upstream protocols will be followed properly.
 |
- Now, assuming nothing about the slave, prove that all upstream protocols will still be followed.
 |
It’s really that simple.
In my own designs, I have these two proofs separated by the SBY configuration. Here, for example, is the task declaration section of the AXI-lite fault isolator’s SBY configuration file.
[tasks]
prf
cvr    fault     opt_reset
fault        prf
prfr         prf opt_reset
faultr fault prf opt_reset
longr  fault prf opt_reset opt_long_reset
prlong       prf opt_reset opt_long_reset
There’s a different task for each proof, shown on the left, together with a
series of tags defining common portions of each proof. Those proofs without
the fault tag will define a design parameter, F_OPT_FAULTLESS, to be one.
This is done within the Yosys script section, as shown along with other
parameter declarations below–such as whether or not the core should reset
itself on any error, or how many cycles that reset pulse should require.
[script]
read -formal axilsafety.v
read -formal skidbuffer.v
read -formal faxil_slave.v
read -formal faxil_master.v
--pycode-begin--
cmd = "hierarchy -top axilsafety"
cmd += " -chparam F_OPT_FAULTLESS %d" % (0 if "fault"     in tags else 1)
cmd += " -chparam OPT_SELF_RESET  %d" % (1 if "opt_reset" in tags else 0)
cmd += " -chparam OPT_MIN_RESET   %d" % (16 if "opt_long_reset" in tags else 0)
cmd += " -chparam OPT_TIMEOUT 10"
output(cmd)
--pycode-end--
prep -top axilsafety
A generate block within the design then includes the bus properties of the
downstream slave in addition to those of the upstream master if ever
F_OPT_FAULTLESS is set. The second proof, those with the fault tag set
above, sets this parameter to zero, and so the proof then assumes nothing about
the downstream slave. If both proofs pass, then we know that the upstream
interface will follow the bus protocol independent of what the downstream core
does.
In general, this logic has the following form–independent of which bus fault isolator is getting verified, AXI, AXI-lite, or WB:
module bussafety #(/* parameters */
	) (/* portlist */,
	output reg fault_detected);

	/* Core logic */

`ifdef	FORMAL
	//
	// Invoke the bus bus property set to include
	// the bus properties of the upstream interface
	//
	fbus_slave #(/* bus parameters */)
	fslave(/* upstream bus ports */);

	//
	generate if (F_OPT_FAULTLESS)
	begin
		//
		// Assume the downstream slave "behaves" by instantiating
		// the downstream property set
		//
		fbus_master #(/* bus parameters */)
		fmaster(/* downstream bus ports */);

		//
		// Assert that no fault will ever be detected
		always @(*)
			assert(!fault_detected);
	end else begin
		//
		// No assumptions about the slave here
		//
	end endgenerate
`endif
endmodule
The rest of the proof is just asserting that the state of the upstream bus properties match those of the internal state of the core, and (possibly) that the downstream properties match as well.
My bus fault isolators also have one other option that we’ve mentioned above,
and that is the option to restore a downstream slave core to the bus following
a fault. It’s configured above as part of the OPT_SELF_RESET parameter.
Basically, on any fault, a downstream reset is generated. Why? Well, it has
to be. Otherwise, how will you know that the next response from the
downstream core isn’t a response to the last response, you know–the one that
you gave up waiting on when you declared a fault? You need a way to
resynchronize the downstream core with the upstream interface, and a reset is
the easy/only way to do that.
This also means that you have to use the firewall downstream of any (trusted) interconnect, or you would need to not only reset the entire interconnect but also all of the masters connected to it. This leads to a required bus topography similar to the one shown in Fig. 11 below.
 |
Want to see how this works? Feel free to examine either my AXI bus fault isolator, my AXI-lite bus fault isolator, or more recently my new Wishbone bus fault isolator design. Indeed, let’s take a look at that AXI-lite bus fault isolator in the next section.
AXI-Lite bus fault isolator
I’ve named my bus fault isolators using the name of the bus followed by the word safety. In this case, because we are using the AXI-lite bus, I’ve named this core axilsafety.
module axilsafety #(Most of the parameters to this core are what you would expect. There’s the address and data widths for example.
	parameter	C_AXI_ADDR_WIDTH = 28,
	parameter	C_AXI_DATA_WIDTH = 32,
Then there’s the timeout. We need this timeout. This will help us find any bugs. For example, if the downstream core fails to accept a request before this counter times out, or fails to return a response before it times out, in both cases we’d declare a bug.
parameter OPT_TIMEOUT = 12,Of course, you’ll probably want to set this timeout to be much longer in practice. I just needed it to be short for the proof to pass–and even then 12 steps was too long for a quick proof.
The second important parameter is the MAX_DEPTH. This is the maximum number
of outstanding transactions the downstream core can ever be allowed to have
outstanding at any time. We’ll need this number to size our counters
properly.
parameter MAX_DEPTH = (OPT_TIMEOUT),The next parameter of interest is the OPT_SELF_RESET. If this parameter
is set, the core will issue a reset to the downstream interface on any
fault–in an attempt to allow you to recover what’s left of the broken design
in the presence of a fault.
parameter [0:0] OPT_SELF_RESET = 1'b1,Further, Xilinx wants their bus resets to be a minimum of 16 clock cycles. While I personally find this rather excessive, a long reset is a requirement of working with their cores, so let’s create this as an option below.
parameter OPT_MIN_RESET = 16Finally, we have the formal F_OPT_FAULTLESS parameter controlling whether or
not we assume the downstream core is faultless or assume nothing of it at all.
`ifdef	FORMAL
	, parameter [0:0]	F_OPT_FAULTLESS = 1'b1
`endif
	) (
I’m going to skip most of the rest of the declarations. They’re mostly busy work, with two exceptions. These are the write fault and read fault indicators. These will be set if ever the core detects a downstream fault.
		output	reg	o_write_fault,
		output	reg	o_read_fault,
The idea is that you should be able to trigger an internal logic analyzer based upon one (or both) of these signals, so you can then catch, see, and debug whatever it is that is going on.
From there, we’ll skip past our register declarations to the write address skidbuffer. As you may remember, handling high throughput (i.e. 100% throughput) within an AXI channel requires a skidbuffer. We’ve used them in each of our AXI slave designs, and this one is no different.
	skidbuffer #(.DW(AW+3)
`ifdef	FORMAL
		, .OPT_PASSTHROUGH(1'b1)
`endif
	) awskd(S_AXI_ACLK, !S_AXI_ARESETN,
		S_AXI_AWVALID, S_AXI_AWREADY, { S_AXI_AWPROT, S_AXI_AWADDR },
		awskd_valid, awskd_ready, { awskd_prot, awskd_addr});
The unique feature of this skidbuffer is that I’ve set the passthrough option for any formal proof.
Why?
This keeps me from needing to re-verify the skidbuffer when verifying this core.
It’s actually a touch worse than that. Not only would I need to reverify the skidbuffer, I’d also need to adjust all of my accounting below based upon what’s in it. Bypassing it for our formal proof just simplifies the proof. I do this commonly for my AXI proofs–it just simplifies things.
You may remember from our Easy
AXI-Lite
example core
discussion how we generated an axil_write_ready signal? We’ll do something
similar here, although here we can treat each channel independently.
In this case, we can accept any request from up stream under two conditions. First, if the slave has faulted or its being reset, then we can only accept the request if the two channels are aligned and the downstream channel isn’t stalled, or otherwise if we have more write data requests than write address requests–at which point it doesn’t matter if the downstream is stalled or not.
	always @(*)
	if (!M_AXI_ARESETN || o_write_fault)
		awskd_ready = (w_aw_greater)
			||((aw_zero)&&(!S_AXI_BVALID || S_AXI_BREADY));
Otherwise, if everything is going well, then whether or not we accept a write address request depends upon whether or not the downstream write address channel is busy or not.
	else
		awskd_ready = (!M_AXI_AWVALID || M_AXI_AWREADY)&& (!aw_full);
The downstream write address valid signal is simply set by the upstream write address signal. It gets cleared on any reset, and nothing moves if the downstream channel is ever stalled. Otherwise we set it based upon the write address skidbuffer’s control signals.
	initial	M_AXI_AWVALID = 1'b0;
	always @(posedge S_AXI_ACLK)
	if (!S_AXI_ARESETN || !M_AXI_ARESETN)
		M_AXI_AWVALID <= 1'b0;
	else if (!M_AXI_AWVALID || M_AXI_AWREADY)
		M_AXI_AWVALID <= awskd_valid && awskd_ready && !o_write_fault;
In general, we want to set the downstream AWADDR and AWPROT any time the
downstream channel isn’t stalled. I make an exception if I’m trying to achieve
low power. In that case, I’ll set the downstream values to zero when not
used.
	always @(posedge S_AXI_ACLK)
	if (OPT_LOWPOWER && (!M_AXI_ARESETN || o_write_fault))
	begin
		M_AXI_AWADDR <= 0;
		M_AXI_AWPROT <= 0;
	end else if (!M_AXI_AWVALID || M_AXI_AWREADY)
	begin
		M_AXI_AWADDR <= awskd_addr;
		M_AXI_AWPROT <= awskd_prot;
	end
That’s all that’s required for the write address channel–we just forwarded the upstream data downstream, with a slight adjustment for if a fault had been detected.
Now let’s move on to the write data channel. As with the write address channel, we start with a skidbuffer–also configured as a passthrough.
	skidbuffer #(.DW(DW+DW/8)
`ifdef	FORMAL
		, .OPT_PASSTHROUGH(1'b1)
`endif
	) wskd(S_AXI_ACLK, !S_AXI_ARESETN,
		S_AXI_WVALID, S_AXI_WREADY, { S_AXI_WDATA, S_AXI_WSTRB },
		wskd_valid, wskd_ready, { wskd_data, wskd_strb});
When should we accept a value from this skidbuffer? As with the write address channel, there are two conditions to check. First, if either a fault has been detected or the downstream core is in reset, then we’ll accept a request if either there are more write address requests than write data requests accepted, or alternatively if we are in sync then only if the upstream return channel isn’t stalled.
	always @(*)
	if (!M_AXI_ARESETN || o_write_fault)
		wskd_ready = (aw_w_greater)
			|| ((w_zero)&&(!S_AXI_BVALID || S_AXI_BREADY));
If, on the other hand, no fault has been detected, then we can just forward any address requests downstream whenever the downstream channel is ready for another data value.
	else
		wskd_ready = (!M_AXI_WVALID || M_AXI_WREADY) && (!w_full);
Let me take a moment to discuss the w_full flag here, and similarly the
aw_full flag above. These flags are required to keep our internal counters
from ever overflowing. It’s one of those lessons you learn from running an
induction
proof that you might miss otherwise. In order to keep our counters from
overflowing, we need to avoid accepting additional values if ever our counters
might overflow by doing so.
The write address logic and indeed even the write data logic follow the same
form as the similar signals for the write address channel above. The big
difference is that on any fault, the WSTRB signal is set to zero–to avoid
(potentially) doing any further damage to a downstream core peripheral in the
case something went wrong.
	initial	M_AXI_WVALID = 1'b0;
	always @(posedge S_AXI_ACLK)
	if (!S_AXI_ARESETN || !M_AXI_ARESETN)
		M_AXI_WVALID <= 1'b0;
	else if (!M_AXI_WVALID || M_AXI_WREADY)
		M_AXI_WVALID <= wskd_valid && wskd_ready && !o_write_fault;

	always @(posedge S_AXI_ACLK)
	if (OPT_LOWPOWER && (!M_AXI_ARESETN || o_write_fault))
	begin
		M_AXI_WDATA <= 0;
		M_AXI_WSTRB <= 0;
	end else if (!M_AXI_WVALID || M_AXI_WREADY)
	begin
		M_AXI_WDATA <= wskd_data;
		M_AXI_WSTRB <= (o_write_fault) ? 0 : wskd_strb;
end |
Having processed the write address and write data channels, we now turn our
attention to the return data path from the downstream core–the B* channel.
As before, high throughput requires a
skidbuffer. Normally,
I don’t use a
skidbuffer on the B*
channel simply because there’s no need to. Here, however, the B* channel
is an input to our core when coming from the slave, and hence the need for
the skidbuffer. Also,
as before, we bypass it for our formal proof.
There’s another reason for bypassing the skidbuffer here: internal to the skidbuffer are assumptions about the incoming logic that might not be valid if the downstream bus doesn’t follow protocol. We need to make certain we don’t make those assumptions, so just setting the passthrough flag on the skidbuffer is no longer good enough–we actually need to skip it entirely.
`ifdef	FORMAL
	assign	bskd_valid = M_AXI_BVALID;
	assign	M_AXI_BREADY= bskd_ready;
	assign	bskd_resp  = M_AXI_BRESP;
`else
	skidbuffer #(.DW(2)
	) bskd(S_AXI_ACLK, !S_AXI_ARESETN || !M_AXI_ARESETN,
		M_AXI_BVALID, M_AXI_BREADY, M_AXI_BRESP,
		bskd_valid, bskd_ready,  bskd_resp);
`endif
On any write fault, we’ll accept whatever it is the downstream core sends us.
Perhaps that’ll help it flush itself out … before we reset it. In all other
cases, we read from the
skidbuffer only if the
upstream B* channel isn’t stalled.
	always @(*)
	if (o_write_fault)
		bskd_ready = 1'b1;
	else
		bskd_ready = (!S_AXI_BVALID || S_AXI_BREADY);
How shall we set the outgoing B* now that we’ve accepted a response from the
slave? The form of this follows the generic pattern for (most) AXI
logic. Reset on reset, and only update everything else if the channel isn’t
stalled.
	initial	S_AXI_BVALID = 1'b0;
	always @(posedge S_AXI_ACLK)
	if (!S_AXI_ARESETN)
		S_AXI_BVALID <= 1'b0;
	else if (!S_AXI_BVALID || S_AXI_BREADY)
	begin
If we can return a value, then on any write fault or downstream reset
we’ll want to set BVALID. Notice the checks below for !aw_zero and
!w_zero. These are flags indicating the number of write address or write
data requests we’ve received. If aw_zero is true, then we don’t have
an outstanding write data request. Hence we only return a result if we
have valid write address data and write data. The other thing to note is that
we’re only returning data at a 50% throughput. This is to make certain that
our counters stay valid–else we might return too many BVALIDs due to an
off-by-one error. (Yes, the formal tools helped catch that for me–I wasn’t
seeing it until I was “helped” by the tools.)
		if (o_write_fault || !M_AXI_ARESETN)
			S_AXI_BVALID <= (!S_AXI_BVALID&&(!aw_zero)&&(!w_zero));
		else
Under normal circumstances, we’d return a value any time the slave wants to
return a value. Only in this case we don’t trust the slave. Therefore, we
need to explicitly check here for ourselves that the slave has been given both
a write address and a piece of write data before it issued the bskd_valid
signal–lest we return a response for a request that hasn’t yet been accepted
by the slave.
			S_AXI_BVALID <= (!downstream_aw_zero)
				&&(!downstream_w_zero)&&(bskd_valid);
	end
Now we come to one of our first checks for a fault. The rule is that while
the return channel is stalled, the slave isn’t allowed to change things.
Therefore, let’s keep track of whether or not the slaves B* channel is
stalled, and if it is whether or not the BRESP data on that channel changed.
	initial	last_bvalid = 1'b0;
	always @(posedge S_AXI_ACLK)
	if (!M_AXI_ARESETN || o_write_fault)
		last_bvalid <= 1'b0;
	else
		last_bvalid <= (M_AXI_BVALID && !M_AXI_BREADY);

	always @(posedge S_AXI_ACLK)
	if (M_AXI_BVALID)
		last_bdata <= M_AXI_BRESP;

	always @(posedge S_AXI_ACLK)
	if (!S_AXI_ARESETN || !M_AXI_ARESETN || o_write_fault)
		last_bchanged <= 1'b0;
	else
		last_bchanged <= (last_bvalid && (!M_AXI_BVALID
					|| last_bdata != M_AXI_BRESP));
We’ll use this later as an indication of having detected a slave error.
Finally, we’ll forward the write acknowledgment from the slave upstream. In
generall, we’ll just forward upstream whatever the slave returned to us in
the bskd_resp value. Well, not quite. First, on any write fault we’ll
return a slave error. It doesn’t matter what the slave
returns–if o_write_fault is ever set, we’ve disconnected ourselves from the
slave. Everything will return a slave error.
	initial	S_AXI_BRESP = OKAY;
	always @(posedge S_AXI_ACLK)
	if (!S_AXI_BVALID || S_AXI_BREADY)
	begin
		if (o_write_fault)
			S_AXI_BRESP <= SLVERR;
Second, if the slave ever returns an EXOKAY response then we’ve got a problem.
This is an illegal response from an AXI-lite slave, so we need to convert it
to a legal slave error, SLVERR, response.
		else if (bskd_resp == EXOKAY)
			S_AXI_BRESP <= SLVERR;
Everything else goes through without adjustment.
		else
			S_AXI_BRESP <= bskd_resp;
	end
That’s it for the write channel.
Now we can turn our attention to the read channel.
As with the write channels, we’ll start with a skidbuffer. This will help us maintain 100% throughput through the firewall to the slave.
	skidbuffer #(.DW(AW+3)
`ifdef	FORMAL
		, .OPT_PASSTHROUGH(1'b1)
`endif
	) arskd(S_AXI_ACLK, !S_AXI_ARESETN,
		S_AXI_ARVALID, S_AXI_ARREADY, { S_AXI_ARPROT, S_AXI_ARADDR },
		arskd_valid, arskd_ready,  { arskd_prot, arskd_addr });
The ready signal, for reading from the
skidbuffer, comes in
two parts: on fault and regular–just like we did for the write address ready.
On a fault, we are ready if every we have nothing waiting to be returned and
the return R* channel isn’t stalled. Otherwise, if the downstream read
address channel isn’t stalled then we can forward the read address request
downstream.
	always @(*)
	if (!M_AXI_ARESETN || o_read_fault)
		arskd_ready =((r_zero)&&(!S_AXI_RVALID || S_AXI_RREADY));
	else
		arskd_ready = (!M_AXI_ARVALID || M_AXI_ARREADY) && (!r_full);
The ARVALID logic is very similar to the above AWVALID logic. On a reset,
either an upstream or a downstream reset, we clear the AWVALID. Otherwise,
if the downstream core is ready for a new value then we forward it–but only
if there’s no outstanding read fault.
	initial	M_AXI_ARVALID = 1'b0;
	always @(posedge S_AXI_ACLK)
	if (!S_AXI_ARESETN || !M_AXI_ARESETN)
		M_AXI_ARVALID <= 1'b0;
	else if (!M_AXI_ARVALID || M_AXI_ARREADY)
		M_AXI_ARVALID <= arskd_valid && arskd_ready && !o_read_fault;
The read address and read protection values can just be copies of what’s in the
skidbuffer, forwarded
if ever the downstream read address channel isn’t stalled. I make an exception
here for the OPT_LOWPOWER, as I did above. If OPT_LOWPOWER is set then
I’ll clear the address and protection on either a downstream reset or a
downstream fault.
	always @(posedge S_AXI_ACLK)
	if (OPT_LOWPOWER && (!M_AXI_ARESETN || o_read_fault))
	begin
		M_AXI_ARADDR <= 0;
		M_AXI_ARPROT <= 0;
	end else if (!M_AXI_ARVALID || M_AXI_ARREADY)
	begin
		M_AXI_ARADDR <= arskd_addr;
		M_AXI_ARPROT <= arskd_prot;
end |
Okay, now that we’ve done the read address channel, we can move onto the
read data return channel–what I sometimes call the R* channel. As with the
write channels, we’ll place a
skidbuffer
on the incoming read data return channel from the slave.
`ifdef	FORMAL
	assign	rskd_valid = M_AXI_RVALID;
	assign	M_AXI_RREADY = rskd_ready;
	assign	{ rskd_resp, rskd_data } = { M_AXI_RRESP, M_AXI_RDATA };
`else
	skidbuffer #(.DW(DW+2)
	) rskd(S_AXI_ACLK, !S_AXI_ARESETN || !M_AXI_ARESETN,
		M_AXI_RVALID, M_AXI_RREADY, { M_AXI_RRESP, M_AXI_RDATA },
		rskd_valid, rskd_ready,  { rskd_resp, rskd_data });
`endif
When shall we read a value from this skidbuffer? On any read fault–just to flush the downstream core as much as possible. Similarly, we’ll read any time the upstream return channel isn’t stalled.
	always @(*)
	if (o_read_fault)
		rskd_ready = 1;
	else
		rskd_ready = (!S_AXI_RVALID || S_AXI_RREADY);
We then need to return the read data upstream.
As with the B* channel, this return path has a specific format in order
to make certain we remain protocol compliant. 1) we reset to zero, and 2)
we only adjust RVALID when the upstream channel isn’t stalled.
	initial	S_AXI_RVALID = 1'b0;
	always @(posedge S_AXI_ACLK)
	if (!S_AXI_ARESETN)
		S_AXI_RVALID <= 1'b0;
	else if (!S_AXI_RVALID || S_AXI_RREADY)
	begin
If the upstream channel isn’t stalled, then whether or not we set RVALID
again splits into two cases. The first case would be when a read fault
has been detected or if the downstream core is in reset. (Note, that the
downstream core might be in reset even if there was never any read fault. The
write channel might have faulted for example.) If the downstream core is
in a fault or reset condition, then we immediately return any requests, and
return outstanding values but only on every other clock cycle.
		if (o_read_fault || !M_AXI_ARESETN)
			S_AXI_RVALID <= (!S_AXI_RVALID && !r_zero)
					|| (arskd_valid && arskd_ready);
		else
			S_AXI_RVALID <= (!downstream_r_zero)&&(rskd_valid);
	end
Why not on every return? I suppose I could’ve written this core to continue with 100% throughput even in the presence of a fault. I would’ve needed to check whether the count of outstanding values was not just equal to zero, but also whether or not it was equal to one and a return was being issued. I’ve tried to be cleaner and to avoid this double check. Further, I judge that no one really cares about speed that much once the core has already faulted. All that’s left at that time is failure analysis and limited recovery.
Also, if there’s no fault above, then I set RVALID on two conditions.
First, the slave must be attempting to return a response, and second only
if the slave has accepted a request. Note that whether or not the slave
has accepted a request, as captured by the downstream* counters and flags,
is different from whether or not the bus fault isolator has accepted a
request. It might be that there’s a request pending for the slave to accept
and the slave returns a value too soon. We’ll want to detect that here.
That brings us to the contents of the read data return channels. These again follow the form of any AXI data channel. We can only adjust things if the channel isn’t stalled.
	always @(posedge S_AXI_ACLK)
	if (!S_AXI_RVALID || S_AXI_RREADY)
	begin
Then, on a fault, we’ll just return zero data–otherwise we’ll return whatever the slave has requested.
		if (o_read_fault || !M_AXI_ARESETN)
			S_AXI_RDATA <= 0;
		else
			S_AXI_RDATA <= rskd_data;
The read response signal, whether an okay or some kind of error, takes a touch
more work–as did the write response code above. On any fault, we return
a bus
error, known to the AXI protocol
as a slave error or SLVERR. On the other hand, if there is an outstanding
transaction downstream waiting for a response, then we copy it upstream.
		S_AXI_RRESP <= OKAY;
		if (o_read_fault || rskd_resp == EXOKAY)
			S_AXI_RRESP <= SLVERR;
		else if (!downstream_r_zero)
			S_AXI_RRESP <= rskd_resp;
	end
Our next task is to determine if the slave ever changed an incoming value while we had the return channel stalled. This will feed into a read fault on the next clock if true.
	initial	last_rvalid = 1'b0;
	always @(posedge S_AXI_ACLK)
	if (!S_AXI_ARESETN || !M_AXI_ARESETN || o_read_fault)
		last_rvalid <= 1'b0;
	else
		last_rvalid <= (M_AXI_RVALID && !M_AXI_RREADY);

	always @(posedge S_AXI_ACLK)
	if (M_AXI_RVALID)
		last_rdata <= { M_AXI_RRESP, M_AXI_RDATA };

	always @(posedge S_AXI_ACLK)
	if (!S_AXI_ARESETN || !M_AXI_ARESETN || o_read_fault)
		last_rchanged <= 1'b0;
	else
		last_rchanged <= (last_rvalid && (!M_AXI_RVALID
			|| last_rdata != { M_AXI_RRESP, M_AXI_RDATA }));
Counting Outstanding Transactions
Did you notice how the logic above depended upon a series of counters to keep track of how many requests were outstanding? Let’s flesh those out here.
First, we’d like to keep track of how many requests are outstanding on the write address channel.
	initial	aw_count = 0;
	initial	aw_zero  = 1;
	initial	aw_full  = 0;
	always @(posedge S_AXI_ACLK)
	if (!S_AXI_ARESETN)
	begin
		aw_count <= 0;
		aw_zero  <= 1;
		aw_full  <= 0;
	end else case({(awskd_valid && awskd_ready),S_AXI_BVALID&&S_AXI_BREADY})
	2'b10: begin
		aw_count <= aw_count + 1;
		aw_zero <= 0;
		aw_full <= (aw_count == { {(LGDEPTH-1){1'b1}}, 1'b0 });
		end
	2'b01: begin
		aw_count <= aw_count - 1;
		aw_zero <= (aw_count <= 1);
		aw_full <= 0;
		end
	default: begin end
	endcase
In this case, aw_zero is a registered copy of aw_count == 0, and aw_full
is a registered copy of &aw_count. That just helps us reason about these
values above without needing to burden the logic above with doing the
comparison at the time it is used.
You might also wish to note the case() statement. A common beginner mistake
is to forget that the two channels, write address request and write response,
are parallel and independent. They might both accept requests at the same
time, and the case() statement helps to encode that value properly.
The write data counters have almost the same logic as the write address counters above.
	initial	w_count = 0;
	initial	w_zero  = 1;
	initial	w_full  = 0;
	always @(posedge S_AXI_ACLK)
	if (!S_AXI_ARESETN)
	begin
		w_count <= 0;
		w_zero  <= 1;
		w_full  <= 0;
	end else case({(wskd_valid && wskd_ready), S_AXI_BVALID&& S_AXI_BREADY})
	2'b10: begin
		w_count <= w_count + 1;
		w_zero <= 0;
		w_full <= (w_count == { {(LGDEPTH-1){1'b1}}, 1'b0 });
		end
	2'b01: begin
		w_count <= w_count - 1;
		w_zero <= (w_count <= 1);
		w_full <= 1'b0;
		end
	default: begin end
	endcase
This core also requires knowing whether or not we’ve received more write
address requests than write data requests and vice versa. In particular, on a
fault if we’ve ever received more of one request than the other then we need
to balance the two channels out. Here, we capture that reality.
aw_w_greater will be true if we’ve ever accepted more write address requests
than write data requests, and vice versa for w_aw_greater.
	initial	aw_w_greater = 0;
	initial	w_aw_greater = 0;
	always @(posedge S_AXI_ACLK)
	if (!S_AXI_ARESETN)
	begin
		aw_w_greater <= 0;
		w_aw_greater <= 0;
	end else case({(awskd_valid && awskd_ready),
			(wskd_valid && wskd_ready)})
	2'b10: begin
		aw_w_greater <= (aw_count + 1 >  w_count);
		w_aw_greater <= ( w_count     > aw_count + 1);
		end
	2'b01: begin
		aw_w_greater <= (aw_count     >  w_count + 1);
		w_aw_greater <= ( w_count + 1 > aw_count);
		end
	default: begin end
	endcase
Our read counter is similar to the two write counters above, but otherwise unremarkable.
	initial	r_count = 0;
	initial	r_zero  = 1;
	initial	r_full  = 0;
	always @(posedge S_AXI_ACLK)
	if (!S_AXI_ARESETN)
	begin
		r_count <= 0;
		r_zero  <= 1;
		r_full  <= 0;
	end else case({(arskd_valid&&arskd_ready), S_AXI_RVALID&&S_AXI_RREADY})
	2'b10: begin
		r_count <= r_count + 1;
		r_zero <= 0;
		r_full <= (r_count == { {(LGDEPTH-1){1'b1}}, 1'b0 });
		end
	2'b01: begin
		r_count <= r_count - 1;
		r_zero <= (r_count <= 1);
		r_full <= 0;
		end
	default: begin end
	endcase
When I first wrote this core, my intention was to only use a single set of counters for outstanding transactions–i.e. the three counters above. Then as I got into working with the cores, I realized I needed another set as well. I needed a set of counters to determine when something was outstanding on the downstream side separate and independent from the upstream side. The two sets of counters could (and would) get out of sync.
Hence, I needed to count outstanding downstream write address transactions,
	initial	downstream_aw_count = 0;
	initial	downstream_aw_zero = 1;
	always @(posedge S_AXI_ACLK)
	if (!S_AXI_ARESETN || !M_AXI_ARESETN || o_write_fault)
	begin
		downstream_aw_count <= 0;
		downstream_aw_zero <= 1;
	end else case({(M_AXI_AWVALID && M_AXI_AWREADY), M_AXI_BVALID && M_AXI_BREADY})
	2'b10: begin
		downstream_aw_count <= downstream_aw_count + 1;
		downstream_aw_zero <= 0;
		end
	2'b01: begin
		downstream_aw_count <= downstream_aw_count - 1;
		downstream_aw_zero <= (downstream_aw_count <= 1);
		end
	default: begin end
	endcase
outstanding downstream write data transactions,
	initial	downstream_w_count = 0;
	initial	downstream_w_zero  = 1;
	always @(posedge S_AXI_ACLK)
	if (!S_AXI_ARESETN || !M_AXI_ARESETN || o_write_fault)
	begin
		downstream_w_count <= 0;
		downstream_w_zero  <= 1;
	end else case({(M_AXI_WVALID && M_AXI_WREADY), M_AXI_BVALID && M_AXI_BREADY})
	2'b10: begin
		downstream_w_count <= downstream_w_count + 1;
		downstream_w_zero <= 0;
		end
	2'b01: begin
		downstream_w_count <= downstream_w_count - 1;
		downstream_w_zero <= (downstream_w_count <= 1);
		end
	default: begin end
	endcase
and finally outstanding downstream read transactions.
	initial	downstream_r_count = 0;
	initial	downstream_r_zero  = 1;
	always @(posedge S_AXI_ACLK)
	if (!S_AXI_ARESETN || !M_AXI_ARESETN || o_read_fault)
	begin
		downstream_r_count <= 0;
		downstream_r_zero  <= 1;
	end else case({M_AXI_ARVALID && M_AXI_ARREADY, M_AXI_RVALID && M_AXI_RREADY})
	2'b10: begin
		downstream_r_count <= downstream_r_count + 1;
		downstream_r_zero  <= 0;
		end
	2'b01: begin
		downstream_r_count <= downstream_r_count - 1;
		downstream_r_zero  <= (downstream_r_count <= 1);
		end
	default: begin end
	endcase
As I mentioned above, these counters are important for making certain that no returns are accepted save those which have already been requested.
Timeout checking
A very important part of our protocol is counting how long it takes the downstream channel to respond. This includes both counting stalls, as in how long it takes the downstream channel to accept a transaction, as well as counting how long it takes the downstream channel to reply.
In all cases, a surprising discovery is that these counters must mirror their counterparts in the bus property set. It seems as though everytime I tried to get smart and do something different or better, the proof would fail–so I’ve had to mirror those counters instead.
Let’s start by looking at the write address channel, and here we’ll count
stalls. We’ll also use the aw_stall_limit register to capture having reached
the stall limit.
	initial	aw_stall_counter = 0;
	initial	aw_stall_limit   = 1'b0;
	always @(posedge S_AXI_ACLK)
	if (!S_AXI_ARESETN || o_write_fault || !M_AXI_ARESETN)
	begin
Obviously, if we are in a reset (or fault) condition, we don’t want to count stalls, so we’ll hold our stall count to zero.
		aw_stall_counter <= 0;
		aw_stall_limit   <= 0;
In a similar fashion, if the downstream core is every ready to accept a
write address transaction, or if no write address transaction is pending
and stalled, then we want to clear our counters as well. Also, in case
this core can only accept a limited number of transactions, then we need to
clear our stall count if ever BVALID is true.
	end else if (!M_AXI_AWVALID || M_AXI_AWREADY || M_AXI_BVALID)
	begin
		aw_stall_counter <= 0;
		aw_stall_limit   <= 0;
That’s not enough. We also need to allow that the write address channel might be stalled if it’s accepted a write address but not yet the associated write data. In that case, as before, we’ll clear our stall counter.
	end else if (aw_w_greater && !M_AXI_WVALID)
	begin
		aw_stall_counter <= 0;
		aw_stall_limit   <= 0;
In all other cases, we increment our stall counter. If the new stall counter will be equal to or greater than our timeout, then we’ve hit our limit–something we’ll note here and register.
	end else begin
		aw_stall_counter <= aw_stall_counter + 1;
		aw_stall_limit   <= (aw_stall_counter+1 >= OPT_TIMEOUT);
	end
We now need to repeat those measures for the write data channel. In this case, they’re almost identical to the write address channel above, so we won’t go through each piece here.
	initial	w_stall_counter = 0;
	initial	w_stall_limit   = 1'b0;
	always @(posedge S_AXI_ACLK)
	if (!S_AXI_ARESETN || !M_AXI_ARESETN || o_write_fault)
	begin
		w_stall_counter <= 0;
		w_stall_limit   <= 0;
	end else if (!M_AXI_WVALID || M_AXI_WREADY || M_AXI_BVALID)
	begin
		w_stall_counter <= 0;
		w_stall_limit   <= 0;
	end else if (w_aw_greater && !M_AXI_AWVALID)
	begin
		w_stall_counter <= 0;
		w_stall_limit   <= 0;
	end else begin
		w_stall_counter <= w_stall_counter + 1;
		w_stall_limit   <= (w_stall_counter + 1 >= OPT_TIMEOUT);
	end
Stalls timeouts are only one type of timeout we need to keep track of. We also
need to know if the slave has accepted a request but isn’t producing a result.
Here, therefore, we look at all the write requests, both data and address,
that have been accepted. If one is outstanding and BVALID remains low,
then we increment a timeout counter here as well. Once it times out, we’ll
raise the write acknowledgement timeout limit hit, or w_ack_limit,
register.
	initial w_ack_timer = 0;
	initial	w_ack_limit = 0;
	always @(posedge S_AXI_ACLK)
	if (!S_AXI_ARESETN || !M_AXI_ARESETN || o_write_fault)
	begin
		w_ack_timer <= 0;
		w_ack_limit <= 0;
	end else if (M_AXI_BVALID || downstream_aw_zero || downstream_w_zero)
	begin
		w_ack_timer <= 0;
		w_ack_limit <= 0;
	end else
	begin
		w_ack_timer <= w_ack_timer + 1;
		w_ack_limit <= (w_ack_timer + 1 >= OPT_TIMEOUT);
	end
The read stall counter mirrors the two write stall counters above.
	initial r_stall_counter = 0;
	initial	r_stall_limit   = 0;
	always @(posedge S_AXI_ACLK)
	if (!S_AXI_ARESETN || !M_AXI_ARESETN || o_read_fault)
	begin
		r_stall_counter <= 0;
		r_stall_limit   <= 0;
	end else if (!M_AXI_ARVALID || M_AXI_ARREADY || M_AXI_RVALID)
	begin
		r_stall_counter <= 0;
		r_stall_limit   <= 0;
	end else begin
		r_stall_counter <= r_stall_counter + 1;
		r_stall_limit   <= (r_stall_counter + 1 >= OPT_TIMEOUT);
	end
The read acknowledgment delay counter mirrors the write acknowledgment delay counter from above as well.
	initial r_ack_timer = 0;
	initial	r_ack_limit = 0;
	always @(posedge S_AXI_ACLK)
	if (!S_AXI_ARESETN || !M_AXI_ARESETN || o_read_fault)
	begin
		r_ack_timer <= 0;
		r_ack_limit <= 0;
	end else if (M_AXI_RVALID || downstream_r_zero)
	begin
		r_ack_timer <= 0;
		r_ack_limit <= 0;
	end else begin
		r_ack_timer <= r_ack_timer + 1;
		r_ack_limit <= (r_ack_timer + 1 >= OPT_TIMEOUT);
	end
Now that we have our counters, it’s time to see if we can detect faults.
Fault detection
The first fault to look for is the write fault.
On a reset, we’ll clear the fault indication. Similarly, if the downstream core is reset, and the self reset option is set, then we clear the write fault indication.
	initial	o_write_fault =1'b0;
	always @(posedge S_AXI_ACLK)
	if (!S_AXI_ARESETN)
		o_write_fault <= 1'b0;
	else if (OPT_SELF_RESET && o_write_fault)
	begin
		//
		// Clear any fault on reset
		if (!M_AXI_ARESETN)
			o_write_fault <= 1'b0;
	end else begin
That’s how the fault indicator gets cleared. How shall it be set?
First, if ever the downstream core returns a value for which it hasn’t seen both a write address and a write data request. In that case, we set the write fault.
		if ((downstream_aw_zero || downstream_w_zero)&&(bskd_valid))
			o_write_fault <= 1'b1;
Second, we’ll have a write fault if any write response is EXOKAY. This
is an invalid return on an AXI-lite channel.
		if (bskd_valid && bskd_resp == EXOKAY)
			o_write_fault <= 1'b1;
Further, if we ever hit any of our timeouts, then we have a write fault.
		if (aw_stall_limit || w_stall_limit || w_ack_limit)
			o_write_fault <= 1'b1;
The last possibility is if the B* return channel values ever changed when
they were supposed to be stalled. That’s also a write fault.
		if (last_bchanged)
			o_write_fault <= 1'b1;
	end
That’s all we need to check on the write channel. If o_write_fault remains
low, then we know we have a good write channel.
Really, there aren’t that many things to check … for AXI-lite. (AXI is harder to check.)
Let’s turn our attention to the read fault detection. Clearing the read fault is the same as clearing the write fault above.
	initial	o_read_fault =1'b0;
	always @(posedge S_AXI_ACLK)
	if (!S_AXI_ARESETN)
		o_read_fault <= 1'b0;
	else if (OPT_SELF_RESET && o_read_fault)
	begin
		//
		// Clear any fault on reset
		if (!M_AXI_ARESETN)
			o_read_fault <= 1'b0;
	end else begin
What might set the read fault? How about a response without a prior request.
		if (downstream_r_zero && rskd_valid)
			o_read_fault <= 1'b1;
Returning EXOKAY is also a fault for an AXI-lite slave.
		if (rskd_valid && rskd_resp == EXOKAY)
			o_read_fault <= 1'b1;
Hitting a timeout is a fault as well, just like the write channel above.
		if (r_stall_limit || r_ack_limit)
			o_read_fault <= 1'b1;
Finally, if the return values change when they’re supposed to be stalled, that’s our last write fault.
		if (last_rchanged)
			o_read_fault <= 1'b1;
	end
That should detect any potential fault condition.
Self Reset
The self reset feature is one of the unique features of my bus fault isolators, over and above many of the commercial tools. I find that being able to start over, without reloading the entire design onto a board again, I can often learn more about what particular and specific conditions cause a fault. Indeed, it’s an important part of debugging for me, so I like having it within my own cores.
If, therefore, we want to reset on error–then let’s take a look at how that’s done.
	generate if (OPT_SELF_RESET)
	begin : SELF_RESET_GENERATION
I actually have two reset options in this design. One option uses a counter
to make certain that the reset lasts a particular duration before getting
released. Let’s examine that one first. If we insist on a minimum reset
duration of OPT_MIN_RESET, then we need to count how long we are in reset
to know when we can release from reset. That’s the purpose of the
reset_counter and min_reset flag.
		if (OPT_MIN_RESET > 1)
		begin : MIN_RESET

			initial reset_counter = OPT_MIN_RESET-1;
			initial	min_reset = 1'b0;
			always @(posedge S_AXI_ARESETN)
			if (M_AXI_ARESETN)
			begin
If we ever come out of reset, then we’ll reset the counter to the minimum reset duration, and likewise declare that the minimum reset duration hasn’t (yet) been achieved.
				reset_counter <= OPT_MIN_RESET-1;
				min_reset <= 1'b0;
Otherwise, if the downstream reset signal is active, then we’ll count down
to zero. Once we hit zero, we’ve had already had a minimum reset delay, so
we can set min_reset for the next step of logic.
			end else if (!M_AXI_ARESETN)
			begin
				if (reset_counter > 0)
					reset_counter <= reset_counter-1;
				min_reset <= (reset_counter <= 1);
			end
Finally, before leaving this section, I stuffed a couple of formal properties
in here. These are important for passing
induction,
but they’re also only specific to this generate block. First, the reset
counter must always be less than the OPT_MIN_RESET value, and second
that min_reset shall only be set when reset_counter has achieved its
zero count.
`ifdef	FORMAL
			always @(*)
				assert(reset_counter < OPT_MIN_RESET);
			always @(*)
				assert(min_reset == (reset_counter == 0));
`endif
		end else begin
Of course, if the user hasn’t requested a minimum reset duration, then we’ve already achieved it whenever we are counting down.
			always @(*)
				min_reset = 1'b1;

		end
Now that we know when our reset has been active long enough, we know what we need to in order to create a downstream reset signal.
First, we go into reset if ever the upstream reset becomes active. Likewise, we’ll enter the reset condition if ever there’s a read or a write fault.
		initial	M_AXI_ARESETN = 1'b0;
		always @(posedge S_AXI_ACLK)
		if (!S_AXI_ARESETN)
			M_AXI_ARESETN <= 1'b0;
		else if (o_write_fault || o_read_fault)
			M_AXI_ARESETN <= 1'b0;
Coming out of reset seamlessly is a bit more difficult than entering reset. In this case, we have to wait for the bus to be idle. Hence, we now wait for a time when there are no write address requests, no write data requests, and no read requests either outstanding or pending in our skidbuffers. At that time, and if the minimum reset duration has been achieved, then we can release from the downstream reset.
		else if (aw_zero && w_zero && r_zero && min_reset
			&& !awskd_valid && !wskd_valid && !arskd_valid)
			M_AXI_ARESETN <= 1'b1;

	end else begin : SAME_RESET
Of course, if we aren’t set up to reset the downstream core on any error, then we can just use the upstream reset value to reset our downstream logic.
		//
		// The downstream reset equals the upstream reset
		//
		always @(*)
			M_AXI_ARESETN = S_AXI_ARESETN;

	end endgenerate
I’ll admit, there’s been more than once when I thought the logic for this core as listed above had become too complex. I’d then go back and count inputs to each logic result. I think I’ve kept them reasonable. The only things that might be a challenge would be the counters. However, FPGA’s often have hardware optimized for additions and comparisons, so those shouldn’t be a problem–especially since their widths have been tailored for the precise widths they need.
Formal Verification
Let’s take a quick look see what it takes to verify this core, remembering the outline I shared above.
First, we’d need to instantiate our bus property set for the upstream interface. These are a set of properties we need to meet no matter how we are configured.
	faxil_slave #(
		//
		// ...
		//
	) axils (
		.i_clk(S_AXI_ACLK),
		.i_axi_reset_n(S_AXI_ARESETN),
		//
		.i_axi_awvalid(S_AXI_AWVALID),
		//
		// ... Skipping the rest for brevity
		//
	);
Let’s quickly check our counters. Remember how we had aw_*, w_*, and r_*
counters, with flags for full and zero? Let’s make sure those flags are
properly set.
	always @(*)
	begin
		assert(aw_zero == (aw_count  == 0));
		assert(w_zero  == (w_count   == 0));
		assert(r_zero  == (r_count   == 0));

		assert(aw_full == (&aw_count));
		assert(w_full  == (&w_count));
		assert(r_full  == (&r_count));
As long as there’s been no write fault, our downstream counters should match their flags as well. Not only that, but there should be a particular relationship between the downstream counters and the upstream ones. This equality check is a key to passing induction.
		if (M_AXI_ARESETN && !o_write_fault)
		begin
			assert(downstream_aw_zero  == (downstream_aw_count == 0));
			assert(downstream_w_zero   == (downstream_w_count  == 0));
			assert(downstream_aw_count + (M_AXI_AWVALID ? 1:0)
					+ (S_AXI_BVALID ? 1:0) == aw_count);
			assert(downstream_w_count + (M_AXI_WVALID ? 1:0)
					+ (S_AXI_BVALID ? 1:0) ==  w_count);
		end

		if (M_AXI_ARESETN && !o_read_fault)
		begin
			assert(downstream_r_zero   == (downstream_r_count  == 0));
			assert(downstream_r_count + (M_AXI_ARVALID ? 1:0)
					+ (S_AXI_RVALID ? 1:0) ==  r_count);
		end
We also need to check that our various counters match the similar counters within the bus property set.
		assert(aw_count == faxils_awr_outstanding);
		assert(w_count  == faxils_wr_outstanding);
		assert(r_count  == faxils_rd_outstanding);
Finally, we want to make certain that our inequality flags are properly set as well.
		assert(aw_w_greater == (aw_count > w_count));
		assert(w_aw_greater == (w_count > aw_count));
	end
That should verify all of our logic above. Indeed, the first half of the proof is now done. If we now pass, independent of any properties of the downstream bus, then we’ve proved that we’ll keep the upstream bus isolated from any problems downstream.
The Second Half of the Proof
The other half of the proof is to show that, if the downstream bus behaves, then no fault will be detected.
	generate if (F_OPT_FAULTLESS)
	begin : ASSUME_FAULTLESS
Once we come inside the generate block, the first thing we do is incorporate a set of bus properties for the downstream link. These will limit our proof to only those cases where the downstream link is valid.
		faxil_master #(
			//
			// Skipped for brevity
			//
		) axilm (
			.i_clk(S_AXI_ACLK),
			.i_axi_reset_n(M_AXI_ARESETN && S_AXI_ARESETN),
			//
			.i_axi_awvalid(M_AXI_AWVALID),
			//
			// Skipped for brevity
			//
		);
Now, with those assumptions from the bus property set, our clear and core proof is to prove that no faults will ever be generated.
		always @(*)
			assert(!o_write_fault);

		always @(*)
			assert(!o_read_fault);
All that’s left is to make certain we can meet these assertions.
In particular, we need to then assert that we’ll both never time out.
		always @(*)
		begin
			assert(!aw_stall_limit);
			assert(!w_stall_limit);
			assert(!w_ack_limit);

			assert(!r_stall_limit);
			assert(!r_ack_limit);
We also need to assert that the downstream counters match the identical ones contained within the bus property set.
			if (M_AXI_ARESETN)
			begin
			assert(downstream_aw_count == faxilm_awr_outstanding);
			assert(downstream_w_count  == faxilm_wr_outstanding);
			assert(downstream_r_count  == faxilm_rd_outstanding);
			end
		end
Cover checks
One of the tricks of building any IP core is making certain that it still does what it should. So far, all we’ve done is prove that it doesn’t do what it shouldn’t, but does it still do what it should? Specifically, can we pass data through this core?
So let’s try to cover() this core doing something interesting.
	end else begin : WILD_DOWNSTREAM

		if (OPT_SELF_RESET)
		begin
For example, can we reset the downstream bus as desired? Let’s find out.
First, let’s record if we ever detect a fault–whether a read or write fault.
			initial	write_faulted = 0;
			always @(posedge S_AXI_ACLK)
			if (!S_AXI_ARESETN)
				write_faulted <= 0;
			else if (o_write_fault)
				write_faulted <= 1;


			initial	faulted = 0;
			always @(posedge S_AXI_ACLK)
			if (!S_AXI_ARESETN)
				read_faulted <= 0;
			else if (o_read_fault)
				read_faulted <= 1;

			always @(*)
				faulted = (write_faulted || read_faulted);
Now, let’s check if either fault can send us to a reset condition.
			always @(posedge S_AXI_ACLK)
				cover(write_faulted && $rose(M_AXI_ARESETN));

			always @(posedge S_AXI_ACLK)
				cover(read_faulted && $rose(M_AXI_ARESETN));
Might we ever be in a fault and return a value? Let’ check for that too.
			always @(posedge S_AXI_ACLK)
				cover(faulted && M_AXI_ARESETN && S_AXI_BVALID);

			always @(posedge S_AXI_ACLK)
				cover(faulted && M_AXI_ARESETN && S_AXI_RVALID);
In order to generate the trace shown above in Fig. 7, I needed to see the core come out of a fault and then complete some number of reads or writes. Let’s check for the ability to accomplish more than five writes and more than five reads following a reset.
			initial	cvr_writes = 0;
			always @(posedge S_AXI_ACLK)
			if (!S_AXI_ARESETN || !M_AXI_ARESETN || o_write_fault)
				cvr_writes <= 0;
			else if (write_faulted && S_AXI_BVALID && S_AXI_BREADY
				&& S_AXI_BRESP == OKAY
				&&(!(&cvr_writes)))
				cvr_writes <= cvr_writes + 1;

			always @(*)
				cover(cvr_writes > 5);

			initial	cvr_reads = 0;
			always @(posedge S_AXI_ACLK)
			if (!S_AXI_ARESETN || !M_AXI_ARESETN || o_read_fault)
				cvr_reads <= 0;
			else if (read_faulted && S_AXI_RVALID && S_AXI_RREADY
				&& S_AXI_RRESP == OKAY
				&&(!(&cvr_reads)))
				cvr_reads <= cvr_reads + 1;

			always @(*)
				cover(cvr_reads > 5);
		end
Can you think of anything we missed that should be in this cover check?
	end endgenerate

`endif
endmodule
That ends this walk through.
Do beware that, should you wish to do this yourself, the devil lies in the details, and those details are captured by the bus property set. Hence, you should always start with a working and trusted bus property set. After that, the task is fairly easy.
Conclusions
While bus fault isolators have their purposes, they don’t necessarily fit every application. In particular, the dual reality that they will increase your logic usage as well as the latency of your bus tends to make them less than desirable. Still, they have certainly earned themselves a place in the debugging stack. Use a bus fault isolator when …
-
You have two failing components, and can’t seem to tell which one is truly at fault
-
Your design locks up, and you can’t figure out why. In that case, a bus fault isolator might help you keep a design from locking up, to the point where you can now do the analysis necessary to find the bug.
-
You need a signal to trigger an internal logic analyzer in order to find the evidence of the bus fault at issue.
-
You have external hardware that might need to be reset separate from your design–perhaps due to any partial reconfiguration, perhaps due to a communications link, who knows?
Either way you look at it, the bus fault isolator is useful and it has its place.
Is that why I built these three bus fault isolators? No. I built them because I kept seeing individuals writing into forums wondering why their AXI based designs weren’t working. Or, at least that was the first reason. The second reason was that once I figured out how to build the first one, the rest of them were kind of fun.
Gasp, did I just admit to enjoying this work?
Lord willing, I’d love to come back to my AXI bus fault isolator, and adjust it so it can handle more than one packet at a time. That, however, will be a project for not just another day, but perhaps another couple of weeks.
And I sought for a man among them, that should make up the hedge, and stand in the gap before me for the land, that I should not destroy it: but I found none. (Ez 22:30)