
Windows FPGA designers may not need a Linux machine ... yet
While I do all my work on a Linux platform, all of the OpenSource tools that I use can be built and used under Windows just as well as under Linux.
Here’s a set of FPGA tools that can also be used under Windows:
-
Verilator provides an integrated simulation capability
-
GTKWave provides a very useful trace viewing capability.
-
The ZipCPU toolchain also uses: binutils, GCC, newlib, and libelf.
-
I also use ncurses for creating textual displays, such as any of the ZipCPU debuggers.
-
When I need a home-made graphical capability, such as an OLEDrgb, VGA, or HDMI simulator, GTKmm provides me with a nice platform independent windowing library
At first glance, these might appear to be Linux-only applications.
They aren’t.
They can also run under Windows.
Today, we’ll discuss how to get this toolchain working under Windows.
CygWin, and how to intall it
Cygwin is a program and set of libraries that can be used on a Microsoft Windows machine to make it look, act, and feel like a Linux system.
We’ll use Cygwin today to give us access to enough of a Linux environment, so that we can then run Verilator.
You can find the Cygwin install page here. Go ahead and download the software appropriate for your computer, whether 32 or 64-bit (if you don’t know, download the 64-bit version). Start the installer, and accept the default configuration options until you get to the package page.
The package page lists all of the programs that can be installed under Cygwin, and it lists them by category. You might find it daunting at first—there are a lot of packages to chose from. We’ll select the packages here that are necessary to run Verilator, GTKWave, and even the ZipCPU compiler/toolchain. We’ll also grab some of the packages we may wish to have later in order to install either OLED or VGA simulations. You may need to use the search facility at the top of the page to find the following packages–just don’t hit the return key until you are done.
Here’s our list of packages to enable:
flex bison libtool make gcc-core gdb ddd ctags colorgcc gperf
libisl-devel libisl-doc libmpfr-devel libmpc-devel libmpc-doc
libgmp-devel libgmp-doc binutils automake autoconf autoconf2.5 automake1.15
libcairomm1.0_1-devel libcairomm1.0_1-doc libcairomm1.0_1
libelf-devel libncurses-devel
aspell-en enscript less source-highlight ghostscript gv
git git-gui subversion patch dos2unix
tcl-devel tcl-tk tcl-tk-devel tcl-iwidgets
gtk-doc libgtk2.0-devel libgtk2.0-doc libgtkmm2.4-doc libgtkmm2.4-devel
libgtk3-doc libgtkmm3.0-doc
xorg-server xorg-server-devel WindowMaker xterm
A lot of these packages have LaTeX based documentation. If you want to be able to rebuild that documentation, you may need to download LaTeX as well.
texinfo texinfo-tex texlive texlive-collection-basic-doc
texlive-collection-latex texlive-collection-latex-doc
texlive-collection-latexextra  texlive-collection-latexextra-doc
texlive-collection-langenglish texlive-collection-pstricks
texlive-collection-pstricks-doc
If you find out later that you missed any packages, just restart the same Cygwin setup program that you just ran, but at that later time when you know you need more packages. You can then repeat the configuration, but when you get to the package screen you can add any packages you missed as though you were installing them initially. Cygwin will install only the changes, as you would like it to. Just … don’t forget where you put the Cygwin installer!
Because we’re going to spend some time working on this machine as well, and perhaps even need to do some real work, let’s add in some of my favorite Linux packages to work with:
hexchat putty gnome-terminal screen gvim meld
octave octave-devel octave-doc gnuplot
dia dia-shapes inkscape
These are my favorite editor, gvim, my favorite code-comparison tool, meld, my favorite IRC client, hexchat, and my favorite screen multiplexer, screen. Also included in this list is octave, a free and open source package offering a Matlab-like capability, and dia, a program for making quick vector graphics diagrams. I personally like dia. However you may find that you not only like inkspace better, but also that it is better maintained.
While all of these may not be needed, this was the set I used to prove the toolsuite I use.
Once Cygwin finishes installing, it’ll ask you if you wish to place a cygwin icon on the desktop and in your start menu. I chose to accept the default, which was to say “yes” to both. Then, to start up the Cygwin environment, you can just double click on the Cygwin icon that should now be on your desktop. That will bring up a terminal window that we can then use for our next steps.
Indeed, we are not done yet. Though we have Cygwin installed, Cygwin didn’t come with all of our favorite packages, or the packages we need. Specifically, neither Verilator nor GTKWave were on Cygwin’s list. So, we’ll have to go back and get them separately.
Installing Verilator
The first FPGA support package to get is Verilator. We’ll start by grabbing the sources for Verilator from a tarball found on this page. In my case, that tarball was named verilator-3.904.tgz.
The instructions for installing Verilator, also found on that same page, are fairly simple. At your command line, type:
unset VERILATOR_ROOT
tar xvzf verilator*.t*gz
cd verilator*
./configure
make
sudo make install
Much to my surprise, this worked without any hassles. (I was expecting things to be harder.)
Installing GTKWave
The next program we’ll install is GTKWave. We’ll use this program later to view any traces created by simulations we might run and try.
You can find GTKWave on it’s sourceforge website. On their front page, they have a link to a source tarball. In my case, that tarball was named gtkwave-3.3.81.tar.gz.
We’ll download this tarball and place it into our Cygwin home directory. Once done, we can build GTKWave simply with:
tar -xvzf gtkwave-3.3.81.tar.gz
cd gtkwave-3.3.81/
./configure --disable-xz
make install
At this point, we’re almost ready to try it. One step remains. We need to start up the X-server. We’ll start the server, and then start a window manager (wmaker) and an xterm.
X &
wmaker -display :0 &
xterm -display :0 &
This will create a large window on the display, and place a terminal within it. We can now simulate something with Verilator, and then display it from this window using GTKWave.
Running a Serial Port Test
Now that we have everything installed, we need something to test to prove that this install works.
Perhaps the easiest package to test, and the package that offers a complete end-to-end test case without requiring anything else, is the wbuart32 serial port package. This package contains a complete wishbone controlled UART peripheral, together with some self-contained testing programs–such as Hello World.
To run this test, we’ll first clone the git repository,
git clone https://github.com/ZipCPU/wbuart32and then we’ll change into the new directory we’ve just created. From here, we can build the distro.
cd wbuart32 ; makeThis will also run a UART simulation test, just to prove that the package works.
Once the build and test bench have completed, we’ll move into the C++ test directory and run the Hello World program on its own.
cd bench/cpp
./helloworld
If all works well, you should see the “Hello, World!” characters printed across your screen, and then the program should exit.
Now if you look in your directory (type ‘ls’), you should be able to find a “helloworld.vcd” file. This is a value-change-dump type of file, that contains the value of every variable as it existed on every clock cycle within the simulation we just ran. Not bad, huh?
Let’s start up GTKWave,
gtkwave helloworld.vcdand take a look at what we can find.
If you’ve never used GTKWave before, stay with me. When I first started using GTKWave, the opening screen left me confused. It was big and black with green lines and … didn’t do anything.
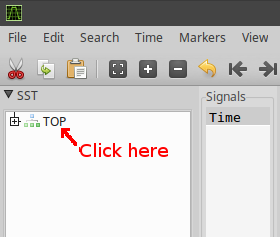 |
Now that I’ve used it for some time, I no longer find it so confusing. Just go over to the left side of the screen. There, in the top of two white panel’s, will be the name of our top level module, TOP, with a plus beside it. Go ahead and click on it (the word TOP, not the plus yet).
 |
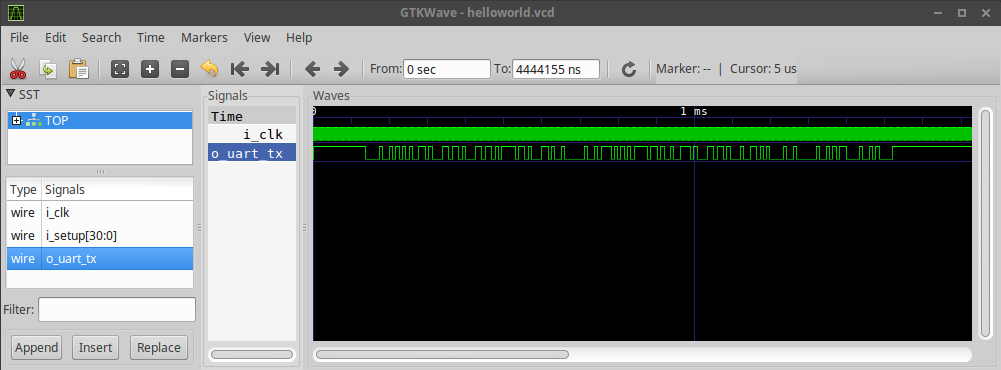
You’ll then see, listed in
the small panel below, all of the external I/O ports associated with our
design. Let’s use the mouse to grab the clock register, i_clk
and drag it to the display area. Next, let’s grab the output serial port
register, o_uart, and drag that to the display as well.
Ok, so now you’ve got two green lines in the display. We can do one better.
While holding the control key down, scroll with the mouse wheel. Go ahead
and scroll out until you see the o_uart field changing. You can then
move over to it and control scroll zoom-in and see what we just did, or simply
use the scroll button to move left or right in time. Doing this, you should
be able to see the waveform shown in Fig. 3 below.
 |
You can view other variables as well. Just go back to that “TOP” value in the upper left pane and click on the plus. This will bring up the next level down in your design. You can then drag any the variables you are interested in into the main green window and see how they line up with the serial port and clock wires that we already added in.
We’ll have to leave for another time, though, the further details of what’s going on. This is enough for the day as it is.
The power of the simulator
Before closing, let me just ask: do you realize the significance of what we’ve just done? We’ve just ran a simulator as though it were a real FPGA. The simulator talked to a console port, just like any real serial port connected to an FPGA might have done. The great point here is that you can learn a lot about what it takes to build and run logic using this simulator!
Sure, it’s not quite the same thing as the real thing. A real FPGA has limits on the amount of logic that can take place between two clock pulses. A real FPGA has a finite number of resources that can be assigned to your logic. A real FPGA would also need to match the baud rate on your terminal program. Still, simulation is one of the big things that will keep you from FPGA Hell, and we’ve just shown you how you can simulate a serial port.
Feel free to write me if you have any struggles, or support this blog on Patreon, and get a vote into what I write about next!
And unto the Jews I became as a Jew, that I might gain the Jews; to them that are under the law, as under the law, that I might gain them that are under the law (1Cor 9:20)